A fair amount of people interested in making 3D fan-art for World of Warcraft have asked me for feedback on how to improve their pieces. While I'm hardly a guru on the subject, a lot of the time I find myself pointing out the same very common mistakes.
To that end, I've decided to put together a list of the most common mistakes I see in WoW 3D art, along with my own solutions on how to fix them. This guide will primarily be for Blender users, as that's what I work in, however the general concepts should be similar.
If there's anything you think I missed, feel free to leave a comment!
Dull Textures / Black Splotches
This is without a doubt the most common problem I've seen people running into, which is where texture colours appear to be dulled or black splotches appear on their textures, as shown on the glaive below.

Image files are mostly comprised of four channels R (red), G, (green), B (blue) and A (alpha). The first three control the colour values of a pixel and the alpha channel controls the transparency of a pixel.
Texture files from World of Warcraft use these four channels, however more often than not the fourth channel serves a different purpose than transparency. The specific use differs depending on various model flags, but the use tends to be some form of specular or emission map.
The problem here is that by default, most 3D software will treat the alpha channel as transparency, which is the cause of both these issues. To fix this, simply disable the alpha channel on your given texture.
In Blender, this can be done by setting the Alpha of an Image Texture node (in the Shader Editor) to None. Alternatively, you could remove the alpha channel completely in a photo editor such as Photoshop, although that's less than ideal.

Flat Emission
Visible sources of light in a scene are important. A typical example of this might be a lantern. But how do you make a lantern light up? You might be tempted to throw a point light on-top of the lantern, but while that "works", it doesn't tend to light the surrounding scene accurately.

The best solution to ensure that the light comes from the lantern itself and not a separate light source is to set the texture of the lantern to be emissive. Easily done, but there's a problem with this that a lot of people run into.


The lantern is now it's own source of light, but the entire lantern is illuminated as one solid block of light. There's no variance where the glass stops and the metal starts. To resolve this, we need to use what's known as an illumination mask; a black and white image where white (or colour) indicates brightness.
Since this is how a lot of emission works in the game itself, a lot of textures in World of Warcraft come with illumination mask counterparts often prefixed as _emissive or _glow. Take for example this dwarven window ar_windows.blp and the counterpart ar_windows_emissive.blp

That's super handy! But what do we do if the game doesn't already have an illumination mask for the texture we're using, such as our pretty lantern above? At that point, you'll need to make one yourself. Don't worry, it's not too difficult.
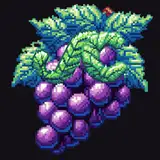
There are many ways you can make one - even just painting over the texture manually can work - but my personal quick solution is to open the texture in Photoshop and create a selection based on a specific colour range (Select -> Color Range); for the lantern in question, yellow!

Once you have a selection, create a new layer and fill it white using that selection. Create another layer underneath it and fill it black. Your end result should look like the colour range preview. Save that as your illumination mask!

Okay, cool. So we've got an illumination mask. How does that help us? Let's put it to use. In Blender, open up the Shader Editor for your lantern texture. Instead of just having an Emission node, we also want a Diffuse BSDF node which we mix with it.

Now add another Image Texture node and load up the illumination mask into that. We're going to use the Colour output from that node to control the mix factor. This means the whiter the pixel, the more of the emission node will be used.

With that, you should now have a lantern which is glowing properly without washing out the texture, and is accurately lighting up the things around it based on the glowing parts.

But wait, there's more! You might now be thinking: that's a pretty dim lantern. You're absolutely correct. Check out the next chapter regarding Emission Overload for a solution!
Emission Overload
This point follows on from the above chapter regarding Flat Emission. Let's say you have a lantern like the one below that's illuminating correctly, but the light is too dim.
The natural response would be to increase the Strength of the Emission for the material, right? The common problem with that solution is that when you're trying to create a really bright light source, you can often completely overload the emitting texture itself.

We've got a nice bright light source now, but the lantern itself looks borderline radioactive; the glass is way too bright. To solve this, we need to create two separate Emission nodes on the shader. The first one we will use to provide light to the scene, and the second one we'll use for the texture itself; this is controlled by a Light Path node using the Is Camera Ray output.

Basically, this means that as far as the camera is concerned, the emission is just 5, which keeps the glass nice and bright without overloading it. As far as everything else is concerned, the emission is 50, which brings much more actual light into the scene. The result? A bright light source that isn't overloaded.

Scatter Shadows
A nice way to add some detail to a scene is to use scatter. There are plenty of these that exist as objects in World of Warcraft such as petals or hay. A common problem is that these actually project a shadow onto the floor below them, making them appear as if they're floating rather than laying flat on the ground.

The obvious solution would be to push them so the model is laying flat on the ground, however sometimes that is not always an option. So how can we solve that? The super-duper easy trick that works 9 out of 10 times is to simply just remove the shadow!

In Blender, simply go to the Object tab. Under Visibility and Ray Visibility, uncheck the Shadow option. Your scatter object will no longer be affected by shadow rays and appear seamless with the ground, ta-da!

But wait, what if the terrain below the scatter is uneven? Removing the shadow won't solve the clipping and perspective. For this particular scenario, I use the Shrinkwrap modifier in Blender.

Set the Snap Mode to Above Surface, the Target to your ground mesh, and the offset to something very small; 0.001m often works fine for me.

There you have it. Your scatter will now nicely follow the ground below, and combined with the shadow removal shown above, will appear completely seamless.
Model Seams / Blocky Model Light
When exporting models from World of Warcraft, they're split up into geosets. For character models, every geometrical appearance option is a separate mesh. This means that all the different components that make up a model are generally not connected to each other. You've probably noticed this if you've ever adjusted a mesh manually.
This problem also manifests itself in blocky looking lighting on models; in general it's a good practice to always resolve this!

Most people don't need to care about this, but I've seen a few people caught out by this in another scenario: mesh subdivision. It's not uncommon for people to slap on a Subdivision Modifier to get a nice smooth model. The problem of the geosets not being one consistent mesh then manifests in the form of visible seams in the model.

Thankfully, the solution to this is quite trivial. In Blender, switch to Edit Mode on the mesh and then press M and select By Distance.

If you've rebound your keys from default or can't access the Merge menu in this manner, you can find it from the Mesh toolbar option at the top.

If needed, you can control the exact merge distance that vertices are merged together, but unless you've manipulated the mesh the verities should be doubled up and the default 0.0001 will work fine.

Broken Normals
When dealing with models from World of Warcraft, it's not uncommon to run into an issue where your normals are broken. What does that mean? Let's take a look at a visual example.

This specific instance - and generally the most common - is caused by the solution to the previous entry on this list: vertex merging.
For models from World of Warcraft, double-sided meshes are generally two separate meshes overlapping each other, facing different ways (meaning they have inverse normals from one another). When merging vertices, Blender is losing 50% of the normals for these double-sided meshes, resulting in this broken pattern.
How do we resolve this? Switch to Edit Mode and select the broken part, in this example the tabard flap. With it selected press Shift + N to recalculate the normals. Problem solved!

Pose Contortion
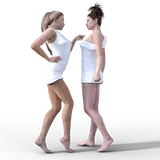
Have you ever found yourself trying to adjust a model into a normal pose only to find that their elbows keep exploding and fingers are the bane of existence? To quote XT-002 Deconstructor: I guess it doesn't bend that way.

Not to worry, the solution is quite simple for this one (for Blender users, at least). Simply add a Smooth Corrective modifier to the mesh and everything should be fine! You may need to adjust the settings for more complicated hiccups.

Side-note: This modifier may break other parts of the mesh, such as eyebrows, so it's best to set up a vertex group assigned to just the broken areas and set the modifier to affect just that group.
Hair Shadows
This is an overwhelmingly common problem I've seen; hair shadows! With dynamically rendered hair, light can pass through it just fine. Hair meshes from World of Warcraft however are solid, meaning that light simply doesn't pass through it. This creates dark shadows which are often glaringly obvious.

My solution for this problem is to wire up the material shader for the hair to be transparent as far as all rays apart from the camera rays are concerned. This is done using a Mix Shader node and a Light Path input, as shown.

This isn't a completely perfect solution, but for 99% of use-cases, it's a quick fix that resolves an ugly issue.

If you have a super bright scene, the complete lack of shadows presented by this solution may appear more jarring than the overwhelming shadows. Using another Mix Shader node, we can fine-tune the amount of shadow to include if needed.