Hey readers this is going to be a new thing where I'll break down parts of my animation process. I'll share interesting aspects of how my animations were made. I want to share the knowledge I've gained over time, and I hope you find it helpful.
So before I go into detail, I use blender 4.1 so some of the techniques may differ if you are using a later or earlier version of blender. I am also mainly using the Eevee engine so that may be a key difference with later versions having Eevee next. I also use some addon that are free/paid to help me get to the final product but most of the techniques can be done free just might be harder/ longer to get to the final product.
POSING

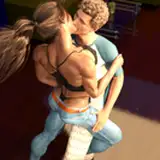
First things first, I try to get the pose of the animation down. The goal of the animation was to depict a blow job in the Street Fighter character select screen. I needed props that would fit the environment, so I used an add-on called BlendKit. It’s very useful when you need anything from a sofa to a chair and it is free to an extent (I personally use the free version). I used it here for the box that Mai is lying on to match the grungy style of SF6.
Getting a good pose is essential for animation, as it's the backbone of what you'll create. So, getting a strong key pose is always my first goal before starting the animation stage.
A tip I'd give for posing is to avoid symmetry. Try to pose each bone separately if you can, as this gives a more natural look to the pose. Symmetry makes things easy, but it can make the pose look lifeless.
ANIMATION
Here's where the magic begins! Pre-warning, everyone animates differently, and this is just how I prefer to animate with the workflow I have. This doesn't mean it's the go-to way you should do it.
The way I do things is I offset a majority of my frames. But to get to that stage, I start with the main body bone in the armature and work outwards: hips, chest, then arms and legs, etc. The goal is usually an in-and-out motion, so my first frame is most of the time a key pose of the most outward pose. Whoever is the main leader of the motion, I'd start animating their bones first. So, with this animation, the male is face fucking Mai so the male is the main lead.

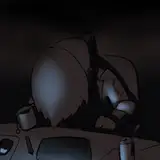
From there I get a key pose for the most in motion and move onto the offsetting of bones. Id then move to the waist bone and do the exact same The loop is framed from 0 – 14 and the max in is keyframed on frame 7 I would highlight all these frames and turn on cyclic with shift+e move these keyframes along an offset of 2 so theres a delay of movement compared to the main bone keyframed. As you can see in the image the keyframes on the timeline are moved along by 2 and you can tell the cyclic is on with the graph editor line is continuously wiggly.
From there, I establish a key pose for the most in pose. Then, I move on to offsetting the bones. I would then move to the waist bone and perform the same process. The loop is framed from 0 to 14, with the maximum in pose keyframed on frame 7. I would highlight all these frames, turn on cyclic with Shift+E, and then move these keyframes along an offset of 2. This creates a delay in the movement compared to the main bone keyframed. As you can see in the image, the keyframes on the timeline are shifted by 2, and the cyclic is evident by the continuously wiggly line in the graph editor.
I continue with this offsetting with every bone visible on the camera if there are multiple angles this is where more than just the visible bones need to be animated and moved so keep that in mind. Make sure to do this offsetting with bones like the spine head shoulders ect. And do the exact same process for the female model.

There's many ways of making the females lips attach to the dick, I use the shrink wrap method a lot for my animations but for this one I wanted to do it manually but the main thing you want to focus on is the top lip being aligned with the top of the penis and adjusting the jaw to the size of what you have. With the lips it works similar to the offsetting you want to add a pushed in pose and a pushed-out pose for the lips and offset them a bit so it looks like the dick is moving the lips with every stroke. On top of that I use a lattice deform on the dick to make it look like the penis is slightly deforming from the suck as it goes in and out. (can make a separate guide if people want more detail on that).
FULL LOOP

At this point, I have a little looping animation of 0-14 frames. Now, I'd say if you're not going to add any additional things to the animation, like separate body movements, slaps, etc., then you should just scale the animation to the length you want, and there you have a perfect full loop. However, there is a very handy, and unfortunately slightly confusing, tool called the NLA editor inside Blender which can help to loop the animation and add variations and all kinds of things to the base loop. I'm only going to go over it briefly as learning the NLA editor is quite tricky and has taken me years to even understand the basics. But essentially, every animation that has been made can be pushed down into a track. Those said tracks can be edited however you want. Since I've made a cyclic animation, I want to make the action clip the length of the mini loop, so 0-14, and make it repeat as many times as I need it to be. I want 10 seconds, so I need it to repeat 22 times. Then you can see the active strip is 308 frames long, so the 14 frames are repeating 22 times along the 308 frames of animation.

You do this for all the tracks you have pushed down. Now that you have tracks pushed down, you can think about adding variations to the animation. I needed a slapping motion for this one, so I grabbed all the bones I needed for each armature and began blocking the slap animation. Since our loop is pushed down into a track, we can now add whatever kinds of animations on top of the loop. Once the slapping motion is done, that can be pushed down into its own track and layered to combine with the animation loop in the NLA. So, as you can see, the NLA is a very handy tool for mixing and blending animations together.
LIGHTING

How I handle lighting in Eevee is by using a lot of point lights. I feel area lights are too harsh, so scaling the radius of a bunch of point lights around the subject using the 3-point method is my go-to. Having a main key point light is always a good start and working from there, reducing the power of additional lights. Because subsurface scattering and ambient occlusion aren't as advanced as they are in Cycles, I do that manually myself by adding small, dim point lights close to the body to add some light scatter on the body to give the render some life. And because the background had this battle of pink and blue on each side, I used these dim colored lights on the body to show they are actually in the environment.
 (No dim lights)
 (With dim lights)
POST PROCESSING / RENDER
Post processing is more up to the artist thing but I always use a glare node the add a bit of blur the render so its give it a bit of realism with addition of the depth of field it works hand in hand. And I fix the colouring with a color balance node incase lights are to bright or darks/ shadows are too dark ect. You can do a really cool thing with the color balance where you can adjust the blues to make it look like a night time render or adjust the reds for a more vibrant morning red shot, so that node is extremely hand in the post processing.
CONCLUSION
And that's all I got I hope this breakdown is something helpful and somewhat insightful I will try to do more of these breakdowns but showing more different things as this could get repetitive please leave any comments about anything you want to know more about that I have showed and thank you for subscribing <3