Doing studies from anime is one of the best ways to practice as it simplifies everything to only the basics. This detailed guide will show you how to do them in the most effective way to improve.
You can get it for free by typing in '0' into the price tab. Enjoy!

Below is an outline of what is inside. You can navigate to each page via the navigation bar on the left on PC, or at the bottom of the page on mobile.
You can also click the "Next →" button at the bottom right of the page.
I hope you find this guide helpful for your art journey!
- Ori
📺 How to do Anime studies
💡 Key points (detailed)
🎨 Study coloring process
⏱️ Timelapse
⭐ PSD/CLIP files for Reference
I generally do anime studies following this 5 step process:
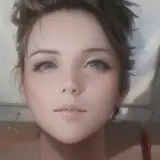
Grab a screenshot or pause a scene from your favorite anime and put it next to you.
Copy it (not trace).
Compare your copy by directly pasting the original on top of yours.
Take down notes of where the differences lie.
Make adjustments to your copy and get it close to the original as possible.
During step 2 you must not just be copying what you see but also thinking why the thing you're drawing looks like that - what is the underlying structure and form?
For example, if you are drawing the face then you might be thinking of the underlying form of the skull and how it impacts where the eyes, nose, mouth, hair is and how it looks like from the current angle.
The easiest way to do this is to analyze the reference directly by drawing over it like what I did in red in the example below.

✏️ I also recommend drawing your copy as if you were to draw it from scratch - such as starting from the basic 3D shape and mannequin. Using the 'Level up drawing system' (the same one I talk about in my hair drawing tutorial) can help you break it up into steps.
For example:
Drawing a box (Lv 0, most basic form)
Note: A box is better than a sphere for learning as it forces you to clearly think about the perspective and 3D shape.
Then lightly erasing that box and drawing a simple mannequin structure on top of it (Lv 1, simple structure)
Then lightly erasing that mannequin and drawing a more detailed sketch on top of it (Lv 2, sketch)
If you want to do lineart you can simply lower the transparency of that sketch layer and draw a neat version of it on a new layer (Lv 3, lineart). But its probably not necessary for studies.

⭐ The reason to do this is because it lets you fix errors and make improvements from the most basic level.
If you draw from the basic forms (Lv 0) and then you find that your final drawing (Lv 2) is off when you compare it with the reference, then you will also be able to trace back that error to the underlying basic structure drawings (Lv 0-1) and find the improvements you need to make there.
And the reason this is important is because when you are doing a study, you have the finished piece as reference so you can literally just go straight to doing the final drawing (Lv 2/3) since you know what it should look like. But when you're drawing your own piece you have to start from drawing the basic structures first (Lv 0). So it makes sense to train from drawing the basic underlying structure and not just the final drawing.
This was actually a painful lesson I had to learn as there was a time I spent a month doing studies every day but didn't improve at all as all I was doing was copying what the final drawing looks like (Lv 2/3) without thinking about the structure underneath (Lv 0-1) 🤦♂️
But the moment I realized my mistake and changed how I practiced, I started to improve again.
⚠️ The only time I wouldn't recommend this is if you are an absolute beginner and this is your first time drawing - in that case it's totally fine and you will even learn a lot from simply trying to copy the shape you see on the reference as best you can (newbie gains are OP 💪). But the moment you know how to draw basic 3D shapes and a simple mannequin I would progress to this method instead!
📈 You can learn more about the 'Level up Drawing System' I use by clicking play on the video below, it will skip straight to the section about it. (Although the video is on drawing hair, the general principle is the same.)
Also if you want to learn more about how to draw the face and the box method, you can watch this video:
How I Finally Got Good at Drawing the Face - 3 Tips that took me out of Beginner HellFinally, Step 4 is very important as its the reflection and analysis on 'what you are currently doing' vs 'what you could do better' that will directly lead to improvement.

By the way, this method works not only for anime studies but for doing studies from illustrations as well.
The process is better understood by taking a look at the timelapse below and layers in the PSD file, but roughly goes as follows:
Sketch folder on top, coloring folder underneath.
Color separation → base colors → shadows → lights
Since anime shading is very simple with just 1st shadows you can get away with just using one multiply layer for all the shadows and clipping normal layers on top to change the colors for different parts.
I wouldn't really use this method for a more complex illustration, but it's a good place to start practicing from (and makes doing these studies faster).
Also if you just want to do this kind of simple anime-like shading in your own illustrations this method can work.
For more info on shading and the 1/2/3 shadow system see this video:
How to Shade Like Japanese Artists - The 1/2/3 Shadow system【TUTORIAL】
Feel free to take a look at the folders and layers as reference for your own studies.
Note: These are for self-learning purposes only. Please do not use them in any other way or redistribute/upload them to other websites.
I hope you found this guide helpful and were able to learn new things from it!
If you did, leave a review by clicking 1-5 stars (PC: Top left of page, Mobile: Bottom of page) as it tells me you enjoyed it and want me to make more like it.
Keep on drawing,
- Ori / @orideizu
P.S. - I'm making a course on the fastest way to learn anime style art!
You can join the waitlist here: