I see many of you asking me to share an article for 'how to draw [insert anatomy part]'. Since I've shared plenty about the upper part of the body, let's continue today with the lower part: legs and feet.
I took the liberty of recording this particular session in which I approach two processes. One is drawing legs from imagination, and the other is using references. I did this because my approach is very straightforward, and watching a video might be more efficient than me giving you a step-by-step tutorial. Find the video attached at the end of this article.
Although this is the first thing you will find in the video because it was kind of a quick warm-up, if you are a beginner artist, I'll not recommend you to go with this approach as it requires some level of spatial awareness. This literally memory works as well with hand movement to come up with shapes I already envisioned in my head.
My process for these sketches is pretty straightforward; you can divide it into two phases. The first one being very messy and chaotic as I'm trying to build up the anatomy from scratch, shaping what's in my mind. It looks odd and awkward, but I don't get too obsessed about getting things right at first because the second phase is refinement. Once I set some decent shapes, I proceed to clean out and fix proportion. The key here is to move forward not expecting to get everything done right at first, just do it.

When applying perspective, the process is similar, but I just add a new step by using Ctrl-T or Command+T and Perspective. I guess with loose lines, creating awkward odd proportions, I refine a bit and I push the perspective. Then I refine again one last time, taking care of proportions that were distorted by the perspective tool.

Pay attention to how I use loose lines to come up with organic leg shapes. Notice how I spend little time cleaning small details and focus on the overall shape of the leg. The difference between this process and all the previous ones I've shared with you is that this is more loyal to my actual process. I don't follow a particular execution out of calculated geometric shapes or steps; my process, in fact, is very chaotic and aims to go quickly to the point, and I believe this is more difficult to grasp.
.
If you are beginner artists, this process makes more sense for you; it's the way you build that visual memory. This step process is similar to the previous one but with a few changes.

Guessing
Guessing shapes does not turn out the same way since I have solid references to look at; this might take more or less time depending on how loyal I want to be and precise in terms of strokes. As you can see in my first attempt, I failed to guess the width in which both legs rest, making the body way too inclined forward. Knees and calves were totally off in comparison to the reference and many other mistakes. The point is, it is okay to get wrong proportions at first; don't obsess over details but instead focus on finishing the overall shape silhouette.

Correction
In order to make proportion corrections, I just pick three or four key points on the reference to compare in my drawing. For instance, in this example, I focus on the direction in which both legs were leaning, the position of both knees and feet. Based on that, I use Ctrl+T/Command+T and Warm to make adjustments in my sketch.
I guess you can say correction is part of refinement, since they are very tight, especially for the drawings from imagination, but in this case, it can have a category by itself, based on the amount of time I just spent making chaotic strokes and using tools to get proportions right. These are not necessarily refined lines, and that's the difference with the next step.

Refinement
Once corrections are fairly over, I tend to make the shape silhouette a bit cleaner by using long and quick curved strokes. This not only makes the anatomy a bit more organic but also adds a layer of energy because of the curves.
 Notice the line quality and shape looseness at first; remember it's not about having a perfect-looking leg/feet but to be able to capture the overall shape with simple organic strokes.
Process Video: https://youtu.be/mDDfrmOCchk

.
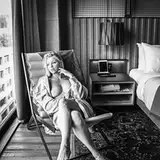
For a quick practice, pick a similar challenge by choosing these type of pictures:
If you feel lucky, try legs in motion, more challenging but worth it. These simple practices might seem obvious for some of you, but that's the way I basically build those paths of creation; hopefully, they might work for you as well. Drop these sketches in our #sketch channel in Discord, and I'll give you 20 Skill Points for this month's challenge. Go get them!
.
So far in Ramon's Channel, we have done "HOW TO":
Thanks for your support.
Ramon Nuñez
2024-08-25 09:53:11 +0000 UTCCarlos Salamanca Ramos
2024-05-22 06:54:42 +0000 UTCRamon Nuñez
2024-05-09 08:22:07 +0000 UTCUnintelligent Being
2024-05-09 04:40:57 +0000 UTC