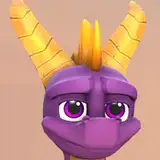
To start off with Cleo herself I printed her roughly 8cm tall to make her a nice size in the fishbowl but for science reasons the fishbowl magnifies her to about 3 times her actual size. I don't know if printing her smaller will fix this but she still fits nicely in the bowl and printing her any smaller will probably make the painting process a lot more difficult. The upside is that if you wanted her to be a larger scale you can do this without having to waste any extra resin!
The next step is the bowl itself, I mentioned in a previous post about the visibility issues with transparent resin which is not as crystal clear as you might expect. My previous attempts having all failed to give the fishbowl the crystal clear look I was aiming for meant it was better for me to buy the fishbowl off Amazon instead, since I decided there was no point in any of it if you couldn't actually see the model itself.

For those poor unfortunate souls who are planning on printing the entire thing, the best method I found that achieved the most visibility was curing the parts, dipping them in floor varnish and then waiting for them to fully dry. The varnish does add a slight yellowish tinge to the parts but its not enough to be visibly noticeable without close inspection. This was the exact method I used to create the rim for the fishbowl in my finished model, I then painted the ornamental details with Vallejo Polished Gold and attached the rim pieces to the bowl using some superglue along the edge.
I printed the signature wooden carved base in wooden PLA which turned out amazing! I sanded off the supports and then painted it with wood stain before sanding it again. I then painted the base all over with a light coat of Arteza Metallic Bronze and Strawberry red for the eyes.

Next it was onto the resin layering. I used Tee Expert 32oz Epoxy Resin:
https://www.amazon.co.uk/gp/product/B08ND1GTJK/ref=ppx_yo_dt_b_asin_title_o08_s00?ie=UTF8&th=1
I bought some disposable 2 oz cups to measure out the right ratio of resin to hardener
https://www.amazon.co.uk/gp/product/B09JGDNVBC/ref=ppx_yo_dt_b_asin_title_o00_s00?ie=UTF8&psc=1
I also bought a pen torch for popping the air bubbles.
https://www.amazon.co.uk/gp/product/B09BVLD3BX/ref=ppx_yo_dt_b_asin_title_o01_s00?ie=UTF8&psc=1
The first layer proved the most difficult since there's no real ratio of how much sand you need to add to the resin, it also settles at the bottom leaving behind a horribly cloudy layer. To avoid this mix about half an oz of resin for your first layer with about 1 oz of sand, add the resin into the sand and mix it thoroughly for a good few minutes before pouring. Pour the resin straight downwards onto a mixing stick aiming to get a really thin line going into the bowl, pouring it at a greater height works best. When you're done quickly blast the layer with the blow torch to pop any larger air bubbles. If there is a cloudy layer after waiting 30 minutes try to scoop it out otherwise you'll risk ruining the end result of your model.

After about 3 hours I added some seashells in the shape of the Mickey Mouse logo to the bottom of the fishbowl for decoration. I then waited roughly 4 hours between each pour in order to give the previous layer time to reach its gel stage. I started off with more but for all of the other layers its best to mix 1 oz of resin with 1 oz of hardener together in a 2 oz cup, this gives you just the right amount of resin height for each layer to cure properly between pours and helps to keep the bubbles at a minimum.

Once I had measured out my resin I mixed it slowly for about 5 minutes, scraping the sides and bottom to make sure it was fully mixed. I then made up some warm water and let the resin sit for a minute in order for it to heat up, which thins it out and helps to release the trapped air bubbles, gently tapping the cup also helps them rise to the surface. I then used a torch pen every minute or so to quickly blast the top of the resin which pops the air bubbles that have been released, when there was barely any bubbles left I poured the next layer into the bowl. The layer lines are frighteningly visible at the start but they start to fade as the resin cures. I added Cleo around layer 4 by suspending her with invisible string that I had hot glued to the tip of her tail fin and arm fin, this made it really easy to peel off when she was fixed in place.

It took me about 3 days of layering every 4 hours to fill the fishbowl entirely and cost less than 40 GBP in materials and despite the project being cursed from the start it turned out exactly how I imagined and I am so happy with the end result!!
Let me know what you think of Septembers models below! and if you end up making your own I'd love to see so don't forget to tag me on Instagram @poisonappleprints.
Join me in the next post for the release of Octobers first Halloween free gift!
Thanks!
Harley