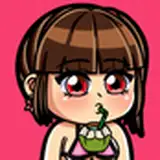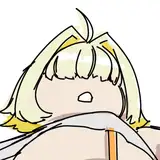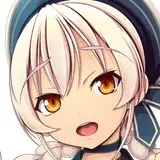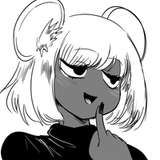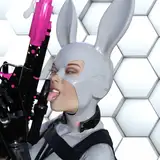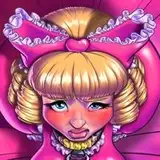
1. Every picture starts with a sketch. This time, I wanted to work on a nice, big close-up so I could play with face details. I used the symmetry ruler in Manga Studio to help me get a highly symmetrical layout for this one, then put in some variations (like shifting the mouth and eyes) to give it some asymmetrical contrast.
2. Since the hair is complicated, it gets hard to see focus on it in the sketch and I decided to go ahead and ink everything else first.
3. Next I sketched the curls and inked them on their own layers, which made it easier to erase the overdraws (places where I drew the line for something so that it overlaps something in the foreground). Always overdraw. You get better curves and lines that way.
4. The chain was tricky. I wanted it to have perspective so it would look like it's being held by the viewer. I switched over to 3DSMax and built a simple 3D model of a chain, with a little bit of twist and a medium curve. Then I exported it and brought it into Manga Studio and a 3D material. Then I just placed it and traced it. I'm finding that this is a very useful technique for simple props, especially when the perspective is tricky.
5. I intended this portrait to be "portrait" style initially but I also wanted to make a full wallpaper version so I drew the skirt extending all the way out so that the image would work as 1680x1050 wallpaper.
6. Now I added a few more details such as adding extra ruffles on the bow and the text for the collar. For the text, I popped over to Photoshop and tried a few different fonts until I found something appropriate, then I applied a text curve to it and exported that image back into Manga Studio where I could trace it and make it look raised. The linework is now complete. I exported it to three bitmaps, one for the chain, one for the text on the collar, and one for everything else.
7. In Photoshop, I combined the bitmaps and start with simple color blocking. I tried to get a little variation in color for this one. I know it looks like some of my previous palettes but I sampled from different sources this time so it's slightly different. I got the skintone and pink and the blonde from a Google image search for "sissy dress". I got the eye color from Matt Bomer, who has very pretty eyes. (This sissy is not Matt Bomer.)
8. Before doing the real shading, I did a very rough shading sketch. I just used a simple hard brush with pen-pressure for opacity and sketched everything in on four layers for the various types of shading effects I wanted to use (which I'll cover in more detail next). This is when I needed to decide exactly where the light sources are. Sketching the shading first is a good idea because it's easier to experiment with different looks and try different colors on the shading. It's also easier to correct mistakes before they matter. As you can see, I messed up on the cast shadow and drew it going the wrong direction so I just mirror flipped that layer in the sketch, which is why the shadows have those pink lines through them. (They're from the opposite side of the skirt.)
9. The first step of shading is basic form shading. Here is where I draw the shading that appears on the surface of any object based on how directly that surface faces the light and how much ambient occlusion there might be in the creases. It's mostly soft but with a few sharp points here and there. I started by creating a new color fill layer, set to Soft Light blend mode. You may find yourself thinking you should use black or dark grey for the form shading but don't! Use something with a little bit of color. Usually, you want something a bit blue, because low light looks bluer. But not too saturate unless you're going for a techno effect. I used something a little more purple for this one since there's so much pink in the environment and that pink would reflect in the shadows.
10. The second shading layer is for back lighting. Not every image has backlighting (although some images might only have backlighting). In this case, since the main light is coming from the right, I want it to seem as if there's a second, pink light off to the left. Backlighting is usually most effective when it comes from the opposite side as the main light. I created a new color fill layer with a very light pink, similar but lighter than the pink of the image, set to screen blend mode. Now it's just a simple soft round brush tracing around the appropriate edges. The trick is to try to keep the pink light inside the shadows of the form shading layer. Look at the sleeve puffs and you can see where the light comes close to the edge of the shadow but is careful not to cover it up. That way you get that bright back edge, then some deeper shadow, then the main color. It makes the roundness really start to pop. But don't put the backlight on every back edge because the backlight might be blocked by things in the picture. That's why there's very, very little pink backlight on sleeve opposite from the backlight source.
11. The third shading layer if for shine. This is just a simple white color fill layer. If it's white, you don't have to use a blending mode. If you choose something with color, make sure you set the blend mode to something like Screen or Color Dodge. Different materials have different shapes and types of shine so you can wind up with all kinds of different brushes for this. I still only used standard brushes, always round, with varying degrees of softness. I also used the smudge tool on highlights in the hair to get some nice streaking. Remember to keep in mind where your main light is. Or any lights. Any bright spots should be based on where the light is. If you just blob the bright spots around without thinking about the lighting, it will look wrong and fake. Once I draw all the shinies, I tinker with the opacity of this layer until it feels natural.
12. The last shading layer is for cast shadows, the shadow cast by objects onto other objects. For this one, it's fine to use a black color fill. If you use color, make sure you set the blending mode to Multiply. Here I used partially soft round brushes and drew in all the different shadows. (The one in front looks odd because it's cast by the chain which isn't visible right now. Don't just blob the shadows in. Try to think about the shape of the object casting the shadow AND the shape of the object that the shadow is cast onto. It takes a little more forethought but the effect really improves the feeling of depth. Also keep in mind that shadows are sharp when they are cast by something nearby and fuzzier as they get further away. That's with the shadow on the skirt is fuzzy near the top but sharper close to the boobs.
13. Now it's time to color the linework. You want to save this until AFTER you do the shading so you can make sure the lines are darker than the deepest shadows. They don't have to be as desaturate as the deepest shadows but they do need to be darker or they'll start to look like objects popping out of the shadows.
14. Now I added the final detail objects. I applied the same shadow layer types to the collar nameplate. I probably could have made the nameplate as part of the main linework but I wanted to be able to tweak the position after the shading was done, to make sure it feels like it's sticking out properly. The chain got it's own unique shine style. I just streaked in some hard dark grey then some medium grey below it, then a soft pink below it. I used pink because the scene is pink. Remember, chrome is basically just a curvy mirror so draw some of the colors in chrome shine from the rest of the scene.
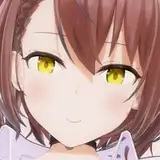
15. I saved the eyes until near the end. The iris is just some circles with inner and outer glow layer effects and then some scribbly lines. Then I blobbed in some white shinies. For the lashes, I used a new layer where I used a dark grey, but not black, hard brush with pen pressure for size. I used separate layers for the top and bottom lashes. First I drew several big fat lashes, like cartoony doll eyelashes. Then I filled in around them with thinner strokes. (Remember, when drawing a curve, always draw so that you can use the rotation of your wrist to make the curve. Don't try to draw a curve the other way. Get up and walk around to the side of your monitor if you have to.) Next I locked the opacity of pixels of the lash layers and switched to a soft round black brush and swept along the edge of the eyelid so that the lashes stayed grey at the points but black where it meets the eyelid. Next I used a soft pink brush and added just a touch of reflected light on the edges. Then I switched back to a hard, pen pressure size, black brush and streaked back over the lashes a little bit to create variation. Honestly, you can barely see it in the wallpaper size but the detail is there.
16. Lastly, it's time for the final effects. I wanted the add a depth of field effect to the chain so that it looks like it gets blurrier closer to the viewer, to enhance the sense of depth. That's why I needed the chain on its own separate layer. I used quick mask and the gradient tool to make a selection that starts strong close to the edge of the image and fades on close to where the chain meets the collar, but not too close. Then I used that selection on the chain and applied a Gaussian blur. Finally, I added a couple of adjustment layers to tinker with the saturation and color balance. I usually find that taking down the saturation helps to make an image feel more real but, this time, I pushed the saturation a little higher and it made the shape really pop so I went with that. And I'm done!
Hina Yui
2015-08-18 08:38:22 +0000 UTCHina Yui
2015-08-18 08:33:24 +0000 UTC