1. I started with a very rough thumbnail. Then I thought, "Hey, what if I do this one as a red-blue 3D picture?"
2. Following the general concept, I do a new rough sketch, working out the final layout and proportions but not focusing on the details just yet but thinking about the perspective and depth, making sure to keep the characters centered enough to allow room for the 3D offset.
3. Now that I know the final layout, I did a quickie 3D test to make sure the basic idea will work in 3D. I drew one version of the scene, then used Manga Studio's Layer Color option to set the folder to Red 40, Green 100, Blue 100 (for the blue lines) . Then I duplicate the folder and change the Layer Color to Red 100, Green 40, Blue 40 (for the red lines), make sure the red lines folder is above the blue lines folder in the layer order, and set the blend mode of the red lines folder to Darken. Then I can play around with making changes to each version to create the 3D anaglyph effect. To make things come forward, I make the red part be more the left of the blue part. To make them recede, I make the red part more the right of the blue part.
4. Next, I do a more detailed sketch, working out the the body, hair, and clothing. I need to plan more of the parts that overlap since, depending on which eye is seeing it, more of it might be visible.
5. Inking. I use a variable-width inking brush for the characters and a constant-width brush for hard things on vector layers. I use lots of different layers for different parts, grouping them in folders and making sure that the layer order matches the order of depth. I break things down into more layers than usual (such as doing the maid's hair in three sections and the face in two section) to make it easier to adjust the 3D depth effect for each part individually. I skip erasing the overdraws (places where I drew the line past other lines that would conceal it) for now since more of the line might be visible to a different eye once I start adjusting them.
6. Once I have my flat linework complete, I duplicate the linework folder and turn the two duplicates into red and blue linework using the same method I used in the mock-up for step 3. But I don't want to get ahead of things and move the red and blue versions of large areas far apart just yet. First, I just work on smaller sections, like just the head or just the skirt, making very small adjustments to give each individual part some subtle 3D depth. Some adjustments are done simply by scaling lines horizontally and some are done with subtle tweaks with the Pinch Vector Line tool.
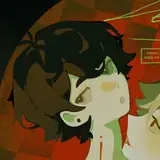
7. Only after I have gotten each section the right amount of depth do I make the large moves, shifting the red part of the head far to left of the blue and the red parts of the sorority girls to the right of the blue. I also go back and tweak a few smaller parts here and there to keep things connected when I move the different sections.
8. Now that I have all the linework in the final positions, I can go back and erase all those overdraws to clean it up. (Notice, for example, that the end of the rope wasn't erased behind the maid back in step 7.)
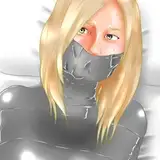
9. Now I add some greyscale fills various parts of the scenes, making sure to use the exact same shade in both the red and blue versions.
10. Finally, I added some action lines as a backdrop.