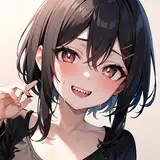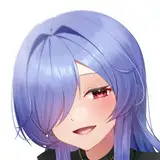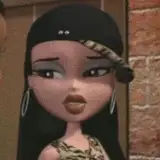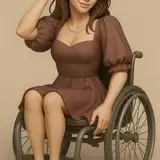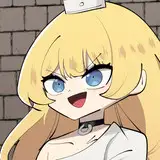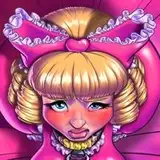
This is a detailed process post on just one aspect of my work on this piece: the coloring and shading the hair!
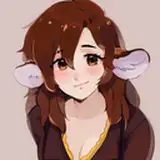
1. Linework. I start with the linework I drew in Manga Studio which I export as a BMP file. In Photoshop, I open that BMP, switch to the Channels tab, then Ctrl-click on RGB to get a selection based on the whiteness of the image. Then I invert the selection and use it to create a folder mask. Inside the folder, I place a black solid color layer. This seems like a lot of unnecessact extra work but it will make linework coloring much easier later. Side note: If you look closely, you'll see that all of the linework for the hair is closed in this image. In other words, there are no feathery open parts that blend the hairline into the skin, as you would see on some of the other characters I have drawn. I like to use a closed hairline versus a feather hairline as a visual cue that the character is wearing a wig.
2. Color blocking. For each base color used in the image, I create a new solid color layer with a mask. That way, I can easily change the color and I can Ctrl-click on the mask to make a quick and precise selection of just that color, which makes shading much easier later. To fill each section, I just use a basic magic wand selection, expand the selection by a couple of pixels, then fill it. Then I go in and touch up the corners, where the fill sometimes doesn't reach, by hand. Selecting a base color for hair can be tricky. I find that it's best to use a color sampled from a real person's hair in a photograph. Even then, it has to be the right balance of saturation and brightness or else the shading will look weird. So after I add the form shading layer, it is sometimes necessary to go back and adjust the base color if the shaded area becomes too saturate and unnatural-looking.
3. The first step in form shading the hair is to create the form shading layer. In this case, I used a dark brown solid color layer with the blend mode set to color burn for an extra rich quality. By placing that shading layer directly above the hair color layer and then Alt-clicking on the edge between the two layer in the layer list, I can limit the effect of the shading to just the hair color layer so I don't have to worry about overdrawing the hair shading onto other parts. I start with the hair shading layer completely filled because I want to paint with light instead of shadow which is generally easier for anything that is lit from the front. In the first stage, I use a simple round, soft, constant-width, variable-density airbrush, just one of the basic brushes built into Photoshop, and I lightly doodle in a bunch of thin lines following the paths of the hairs. I try not to worry too much about precision here because this will be almost obliterated by later steps but it adds a very faint texture to the final look that makes it feel more real, like there really are lots of individual hairs in there.
4. Next, I stick with the same brush but a little bigger. The idea is the same as the last step but, instead of individual hairs, now I'm trying to lay down a base of locks of hair. In both of these steps, I'm not worried about the way light hits the hair. I'm just getting down a basic sense of the form.
5. And one more time with an even bigger brush, this time to create a sense of sections of locks of hair.
6. Now I start shading with the light source in mind. In this image, the light soruce is coming from the bottom-left so the top-right edges get more of the shade. I'm still using the same simple round, soft, constant-width, variable-density airbrush, switching the size as needed, darkening here and there until it feels like the light is really affecting it.
7. Since this hairstyle is very thick and bushy, I went back and really filled large sections of the hair with brighter areas (which technically means I'm using the airbrush to erase the shading from some areas). This obliterates a lot of the detail in those areas but it makes those sections feel much more round and full.
8. Now I switch to the smudge tool. I'm using a simple round, soft, variable-width, variable-density airbrush (so it's the same as the last one, just with the width changing size with pen pressure) and strong smudge strength of 75%. I go back over the shading just in the areas where the shading is deepest and use the smudge tool to streak in some fine detail. When painting curves like this, it's important to always paint using the natural fulcrum of your elbow. You always want to be drawing the curve while mostly keeping your elbow in place and just waving your forearm around. This gives you the smoothest curves with the greatest amount of control. Try not to draw curves while going in the opposite direction of your elbow. If you need to draw a curve that goes the other way, flip your canvas or get up and walk around to the other side of tablet so you can keep using the natural fulcrum of your elbow.
9. Now I start on the backlighting. In this picture, the underlight, reflected from the sheets, is pink. I didn't use a lot of it since very little of the hair is next to the sheets but I used it a little here and there. I start by painting it in softly along the edges here and there, using the simple round, soft, constant-width, variable-density airbrush I was using earlier. For this underlight, I'm keeping mostly to the bottom-right edges of the hair.
10. Then I switch back to my smudge brush and add detail to the underlight, just like I did in step 8. Since this curve opens to the left and I'm right-handed, I had to get up and lean over the tablet from the other side so I could draw the curves naturally.
11. Then I repeated the process for the second backlight, the glow reflected from the candles.
12. Shine. Now it's time to start putting in the shine. I start with an empty white layer, set to blend mode overlay and use a simple round, hard, constant-width, variable-density brush to brush in some basic streaks. I'm not worried about them being too blocky at this point. The important thing is to make sure they face the light source and have a lot of variety in size and length to give a sense of hair complexity.
13. Now it's back to the same smudge brush and I smudge some detail into the shine.
14. Back to the soft airbrush and I add some soft glow to the middle of each section of highlights.
15. Now I switch the airbush to erase and use it to soften up one side of each set of highlights, usually on the bottom but it depends on the curve of the hair.
16. Now I make the airbush very small and use it to erase a few narrow gaps into each set of highlights, usually just one or two for each section. And that completes the shading process!
17. Finally, I select my line color for the hair by sampling from the darkest part of the shading, then dropping the brightness by about 2% and increasing the saturation by about 8 points. The idea is to make the lines just barely visible by still very close in value to the darkest parts of the hair. This makes the hair look very soft, especially compared to other objects which have darker or more highly-contrasting linework.