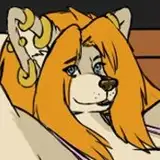
In this picture, I'm trying out a new method for shading fur which is super-easy and fast. It uses a slightly obscure tool called the art history brush. It's the tool that looks like a brush with a little curl around it.
1. To set up for using the art history brush, first I have to set up a general soft shade which I painted in the usual way with a soft, round airbrush. I usually shade by using a solid color layer, in this case dark brown, set to multiply. The art history brush that we're going to use bases the angle of the brush on brightness and, since I'm painting in the mask of a solid color layer, it's going to think my brightness is the other way around from how I want it so I painted the shading and then inverted so I have dark where I want light and vice-versa. I recommend that you experiment with this fur shading method using a simpler shading method, like just a simple black and white to see how it works.
2. To use the art hisory brush, you have to set a history reference point. So I go to the History tab and choose the last step in my history, the point where I inverted the shading.
3. I made a special fur tip brush for this purpose. It's just a simple wavy stroke that fades out at the thick end. I also set it to angle the brush to follow the stroke of the pen with a small amount of angle jitter (5%), plus some medium size jitter (54%) set to pen pressure with a minimum diameter of 44% so it never gets too small, and flip X jitter only.
4. In the art history brush, I select my new fur brush and set the mode to normal, the opacity to 100%, the style to Dab, and the area of 8px. You may need to experiment with the area and brush size, depending on the resolution of your image, but these numbers worked fine for the scale at which I'm drawing.
5. Now I just start scribbling back and forth over the fur shading with the art history brush. What it does is to look at what the image looked like at the point in the history that I set as a reference in step 2 and use that shade (or color if you're using a color raster layer) as a source for the brush. Since I'm using Dab style, it plops the brush right down where I'm touching. Other styles make various strokes but I just want to Dab for this. It simulates a stroke that goes perpendicular to the transition from bright to dark so, no matter how I scribble, it draws the fur as if it is pointing outward from the brightest to the darkest area (although it looks backward here because of the way I'm shading in a mask). I try to scribble mostly in and out instead of across. If you go across, you get something that looks more like layers of fur instead of a mass.
6. Once I'm satisfied, I invert the shading of the fur and it's done! Soooooo much faster that trying to smudge in every one of those fur strokes by hand.
7. For the fur backlight, I use the same process - roughing in the shade with a soft round airbrush, just along the edge, setting a new art history reference point in the history tab and...
8. ...using the art history brush to create the strokes. Although, this time, I want it to stay going dark to light so it looks like the backlight is coming from behind the fur hairs.
And that's it! A super-easy and fast fur-shading method.