Inking isn’t really what my art is known for but it’s nonetheless an integral part of my comic-making process. I’m a painter at heart and over the years I’ve experimented with different ways of inking my comics so the subjects pop and the process is that little bit quicker to finish. I do most of my inking digitally; I keep a sketchbook I do pen drawings in when I am out and about so I can practice and keep in form but the bulk of my professional work is done on a computer where I can erase and re-ink forever and ever. There are a lot of fantastic artists who do wonderful inks in traditional media but in my comics inks are more a means to an end, since my primary focus is my tones. I wanted to take a moment and establish this before diving into this particular subject, since my inking process is pretty cut and refined to how I specifically work. It’s not a strong point of mine so I’m not comfortable claiming expertise over the finer points of it but it’s a vital part of my work and I’d like to share the tricks I have learned to explain a little bit about how it fits within the body of my own work and, ideally, offer insight so someone reading this might discover their own way of inking their work. It’s a very personal, evolving process. I’m always learning. I’m going to make a big XXXXX mark down this post so if you want to skip over the history of my work and get to the advice part you know where to jump to, as a service to whoever might need it.
My inking process actually has its roots in my earlier digital artwork I did before I started making comics. I grew up drawing on computer paper or lined paper or whatever paper I could find using whatever pencils I had on hand for years and years until I discovered Photoshop and digital art. The way I used to integrate how I learned to draw into this new program was I’d use a lot of pencil on paper to sketch a figure lightly and then use a 2B 0.5mm mechanical drafting pencil to go over and really sharpen up my lines and my details. I’d then scan it into Photoshop, use Layers or Curves to contrast out the light pencil remnants and the tooth of the paper and lift the lineart off of the background onto its own layer so I could paint and color beneath it, effectively putting color between my pencil and my paper while preserving the texture of each. It had a certain grittiness to it which I liked, but it was sloppy. I had to learn how to maintain that organic linework while also making it sharper-looking, which is sort of a contradiction but it’s been the story of my career to date.
When I started making comics I was making them on an old laptop at my night job; I was a mechanic in a bowling alley so I had an office to myself and a lot of downtime. I’d smuggle my laptop and a little five-inch USB tablet into the office, turn on the radio and draw in Photoshop. My old pencilshop process is extremely evident in my earliest comic pages- the way I’d work was I’d use a hard-round brush and just sketch in my figures like I was using a pencil and then use a smudge tool to blend translucent greys in a layer beneath that. Since my laptop wasn’t that great I made the first hundredish pages at 72dpi, which is why they start out looking fuzzy, but in the very beginning of the comic my inks were effectively pencils I would erase to clean up, but that soon changed as I began to experiment with styles and color.
The first color pages in Dead Winter were a dream sequence, so to separate them from the grittier lineart of the waking world I decided to do them in a different style altogether, rather than just put color behind the same kind of lineart. The original idea was to do it entirely lineless (pp 15-17, 47-54) to help visually separate it, but in working without lines I began to explore different ways of creating tighter-looking shapes with my paints, so when the dream sequences ended I began thinking of new ways to incorporate what I learned making art without lines into my art with lines. Around page 64 I began experimenting with the second pass, where I’d sketch my figures like normal but instead of using that as my inks I would create a second layer, make the first one 30% translucent and go over my art carefully with cleaner brushstrokes, effectively getting rid of the exploratory stray marks my comic started with. It was like using a lightbox to ink on a separate sheet of paper and by cleaning up the art a little more I had more room to tell more with my tones, and this was probably the first major step towards my comics developing the style they have today.
My early second-pass lineart was still a little rough since it was effectively a guided sketch but it was cleaner than what it used to be, but around page 100 I started to get a sense of how to tighten up my inks. My backgrounds started developing more contrast, so on page 116 the second-pass lineart became very clean but I also added a bold silhouette outline to my figures to help define the space the character is taking up and separate them from the background. This bold outline served another purpose: when I did my sketchwork I had a bad habit of leaving gaps between lines, I wouldn’t connect them all the way. Going around the whole figure with a slightly bolder outline meant that while my bad habit of not connecting lines persisted inside the figure their exterior would be watertight, there’d be no bleedover into the backgrounds. Containing a figure helped me keep them as their own entities within the world, I’d learn how to paint them to be incorporated into the background while also being apart from it (a topic for another week!) but I learned to make use of my lineart to separate my subjects from my increasingly-complicated backgrounds.
Astute readers of the comic may have noticed occasional sets of three pages with no tone whatsoever, done purely in black & white inking. These originally served a number of purposes; they were a way for me to explore and flesh out other parts of the world without closing focus on the main characters, they were a way to visually split up the chapters, they were easier to make than regular comics so I allowed myself the occasional break in an era when I’d put in 80 hours a week working on my comics and, relevant to the topic, they were a challenge to myself, forcing me to think about how to model my figures without depending on my painted tones. I mostly did this using sheer black & white shapes, and from page to page I tended to try different ways of duotone inkine, but around pp. 136-138 it really clicked in my head that I could use my inks to help model and describe the interior shapes and textures my tone painting would enhance. I didn’t need to add every little internal creaseline, I just had to know which marks would imply a contour, where something would overlap, where it would pinch or stretch and help shape the paints I would lay down later by implying where three-dimensional forms would actually go without actually drawing them in. Rather than just painting behind my inks I was laying my inks down in anticipation of specific shadow fields, highlights, curves, corners and shapes. The work I was going to do in my next step started informing my inkwork which allowed my painting to get bolder and bolder. And as my painting got stronger my inks took on more and more of a supporting role, being planned specifically to frame, enhance and support the painting; this became their entire purpose, and overtime they became very efficient at what they did.
There was a brief period where I experimented with doing completely lineless artwork (p. 484), laying flat silhouette shapes over my sketch layer and painting my implied outlines into that, but that ended up taking much more time and I wasn’t entirely satisfied with the look so I eventually brought lines back into their supporting role (p. 514) and it turned out practicing without lines helped really flesh out my painting so when the lines came back they were stronger than ever! And that brings us to the present and how I currently work on my comics. I’ve gotten very good at painting without lines but I’ve also gotten pretty decent at working solely with line, and a lot of it came from exploring ways of working without the other and how the two fit together. So naturally I have some tricks to share with you today!
XXXXX
For simplicity’s sake we can boil our art down into two elements, the tones and the lines, where the former represents the broader fields of color or value contrast that constitute our subjects and the latter represents an abstraction of the space in between those shapes, something that doesn’t actually exist in real subjects but our eyes interpret for us. When we set about making an illustration we need to strike a balance between the two elements, allowing one to lead and the other follow like singers in an opera. One spotlights and one supports, whether it’s simpler tones behind very descriptive lines or a simpler framework of lines around a complex set of tones. If both our tones and our lines try to take the center stage they will be singing overtop of one another and create a lot of visual noise, and if neither comes off very strong our art loses its expressiveness. Let one be your strong point and the other support it and you will find beautiful harmony and powerful art. This is my core working philosophy when it comes to drawing a page, and depending on what I want to do I’ll begin it two different ways.
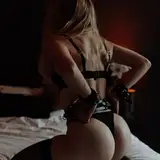
In the image at the top of this post I have the sketch layer of the next comic, but I inked the first panel in two different styles- one anticipating the inks to be the primary element and the other in preparation for the tones to be the star of the show. The one on the right is how I typically prepare my inks for a page, using a bold outline around the entire silhouette and enough little lines on the inside to isolate the major shapes like the shirt, hair and hood from another while describing the little ways they bend and curve. Some of these lines are temporary guides and I’ll often go back to my lineart layer and erase them when I don’t need them anymore or I feel I can get a better look doing them entirely in paint (this usually means painting two contrasting fields in a way where they’re close enough that no black line would exist between them, like the creases inside the elbow of a sleeve). They’re basically a roadmap for building shapes in paint and without the tones they look very plain, but they’re all designed as a framework for something bigger. Any recent page of the comic provides an example of how these look when they’re finished, this is my working process.
The image on the left, however, I approached differently. When I inked this one I didn’t use a bold silhouette outline and I used a bunch of totally new tricks to get the same look with my lines as the lead performer- you can imagine these lines with very simple light and shadow behind them, they would look noisy over a properly-painted page (and I’m actually going to hang onto that layer and put it overtop of my paints when the comic is done just to see how it looks, maybe I might learn something from it!)
One thing I did differently was I approached line weight in a whole new way- I don’t think of lines so much as straight marks or penstrokes but rather as thin little shapes, as this distinction helps me better make use of varying line weight and shadow spots to imply depth and form in between my lines. Line weight means how thick or heavy a line is, and controlling line weight can help a drawn shape appear to have weight and mass by implying the area around it. A line that’s thicker underneath implies pull or shadow, like the point of Lizzie’s hood; while a thinner line describes something that is lighter, brighter or softer, like the back of Lizzie’s hip. When I want to imply depth beneath a shape I’ll add a curved little thickness to a corner area, like a small bead of water or ink clinging to the lines, as I did in the part in Lizzie’s hair over her forehead. I can use a heavier ink area to show both weight and describe the contour of two adjacent shapes, as in the line between Lizzie’s hood and the back of her shoulders. If I want to show depth and imply shadow without drawing an entire shadow I’ll curve out a larger section of black in a corner area, as in the space under Lizzie’s elbow or her bandana, and if I want to show the direction in a material like hair or cloth I like to use a series of variously-broken little lines (Lizzie’s bun, creases in her shirt).
I like to either use a broken-up line moving in one direction or use a series of little lines perpendicular to the direction I’m trying to make to help break up the disruptive power of a line and imply that it’s a part of a shape and not the end of one and beginning of another, as where the sleeve meets the wrist. (This is a tip for painting as well- experiment with perpendicular lines or brushstrokes, they help hide the streak effect of moving your brush lengthwise across a large thin field of value). These broken up little lines or jagged marks are also very good for implying which side of a line is deeper than the other- by putting little marks inside a shape I can give it a more textured feel (like in the shirt sleeves) or show which side of the shape is in front or behind (the back of Lizzie’s neck has its ink on the outside, implying her neck ends where the black begins, whereas the front of her neck has thicker shadow contour to imply a shadow cast by her chin onto her neck, with the white of the background implying the end of the other side of her body) And if I want to create contrast to imply one area as being different from another area it’s surrounded by I can do this with texture- contrasting the hair with the bandana- or value, as the darker marks in the corners of the cross on Lizzie’s back detail. There aren’t going to be any painted tones to make my shapes here so my lines have to describe and hint at them, so if that’s my goal I will build them with entirely different methods in mind.
Lines are powerful tools. They can say a lot about themselves but they also say a lot about the uninked shapes around them by the way they tuck and turn, describing undrawn canvas as being a particular shape by virtue of the linework around that area implying an uninked space as having a particular weight, depth and form. It’s the art of drawing in context and it’s an element I’m still learning and exploring myself, finding new ways to use it and how to get the most out of its strengths. It’s a lot of fun to practice, and I’ve actually taken pencils out of my traveling sketchbook so I force myself to draw directly with ink, anticipating what marks I want to make and adapting uneraseable “mistake” marks into new meaning. My linework has come a long way in seven years of making comics, but their evolution tells a story all their own.
Thanks for reading!