![ラテックスなどの描き方 "How to draw latex" [#2]](https://img5.samsuka.com/storage/12/rf/du/c6f9d9-019e8bde-da42-75e9-a250-ead6c12b6f0d.png)
![ラテックスなどの描き方 "How to draw latex" [#2]](https://img5.samsuka.com/storage/7/xv/dh/c6f9d9-019e8bde-da42-7b80-8f00-161288e14358.png)
![ラテックスなどの描き方 "How to draw latex" [#2]](https://img5.samsuka.com/storage/6/yv/jm/c6f9d9-019e8bde-da43-7153-96ad-e7b59e2a2e75.png)
![ラテックスなどの描き方 "How to draw latex" [#2]](https://img5.samsuka.com/storage/5/ay/sc/c6f9d9-019e8bde-da43-72bb-a7f8-662cf4d7a6e9.png)
![ラテックスなどの描き方 "How to draw latex" [#2]](https://img5.samsuka.com/storage/3/fs/an/c6f9d9-019e8bde-da43-7bcc-941f-21b1cfd1b382.png)
![ラテックスなどの描き方 "How to draw latex" [#2]](https://img5.samsuka.com/storage/8/jr/xc/c6f9d9-019e8bde-da44-7c69-a0c9-e0fba7a9e71f.png)
![ラテックスなどの描き方 "How to draw latex" [#2]](https://img5.samsuka.com/storage/1/gw/ot/c6f9d9-019e8bde-da46-70a4-8a14-797b0852f87d.png)
![ラテックスなどの描き方 "How to draw latex" [#2]](https://img5.samsuka.com/storage/3/fu/ny/c6f9d9-019e8bde-da50-7601-83b9-2b8a85f86efc.png)
![ラテックスなどの描き方 "How to draw latex" [#2]](https://img5.samsuka.com/storage/4/aa/lt/c6f9d9-019e8bde-da54-7e4c-9903-4b2a54f0439e.png)
![ラテックスなどの描き方 "How to draw latex" [#2]](https://img5.samsuka.com/storage/11/nm/vm/c6f9d9-019e8bde-da5b-7ff8-bc6a-4a1e9e11f6ff.png)
![ラテックスなどの描き方 "How to draw latex" [#2]](https://img5.samsuka.com/storage/7/xu/ye/c6f9d9-019e8bde-da5c-75e2-be23-b6adb8fca271.jpg)
こんにちは。
今回はラテックスなどの描き方第2段です!
前回アリスと山風のイラストのアリス側を紹介しましたので、今回は山風側を紹介したいと思います。
English translation follows.
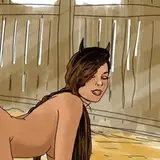
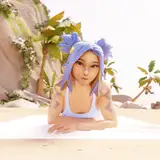
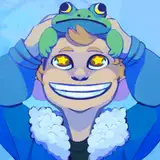
まずは山風の全体図から。
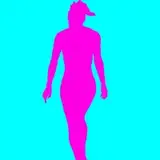
1) まずは下地です。ボディー部分に暗めのグレーとリムに白色を入れています。
Let's start from the base color. The body is dark gray and the rim is white.
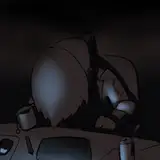
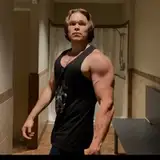
2) 次に、不透明度60%の乗算レイヤーで水彩やエアブラシを使ってざっくり、ぼんやりと黒色を塗っていきます。ここでは黒にかなり近いグレーで塗っています。
Next, use a multiplication layer with 60% opacity and use watercolor or airbrush, and then paint roughly in black. Here I painted it a gray that is very close to black.
3) 1つ前とほぼ変わりないように見えますが、彩度低めのダークブルーをエアブラシを使って塗っています。ここも60%乗算レイヤーを新たに追加します。塗る箇所は1つ前の範囲より少し内側に広げる形で塗っていきます。
It looks almost the same as the previous one, but I used an airbrush to paint it with a dark blue with lower saturation. Add a new 60% multiplication layer here as well. Spread the area slightly inward from the previous area.
4) 今度は隙間をある程度埋める感じで真っ黒を入れていきます。ここでは90%の通常レイヤーです。
This time, I'm going to add pure black to fill in some of the gaps. Here it is 90% normal layer.
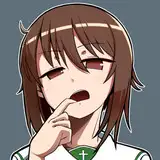
5) 不透明度35%の通常レイヤーで、ハイライトを入れていきます。ここでは濃い水彩を使って白に近いブルーを塗っています。
ハイライトの入れ方ですが、基本的には光が当たる上側の面と照り返しの光があたる下側の面を意識します。あとは光を遮るものも意識します。山風の左側の胸を見ると縦もハイライトが切れている箇所があります。これは山風の首周りに置いているアリスの腕が上から当たる光を遮るため、影ができます。影ができる部分にはハイライトは入れません。
ただし、前述のように照り返しがあることも考える必要があるため、影ができる部分は必ずしも通常の肌や衣服の影の通りにはならないです。光沢のあるものは周りの環境を反射することを意識します。
Add highlights using a normal layer with an opacity of 35%. Here I used watercolor to paint a blue that is close to white.
When it comes to adding highlights, basically you should be aware of the upper side where the light hits and the lower side where the reflected light hits. Also, be aware of things that block the light. If you look at Yamakaze's chest on the left side of the picture, there is a part where the highlight is cut off vertically. This is because Alice's arm around Yamakaze's neck blocks the light from above, creating a shadow. Do not add highlights in areas where there are shadows.
However, as mentioned above, you also need to consider the possibility of reflection, so the areas where shadows are created will not necessarily match the normal shadows of skin or clothing. Be aware that shiny objects reflect the surrounding environment.
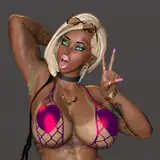
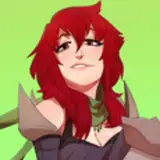
6) 次に照り返しの光です。レイヤーは通常の100%です。色は山風の髪色に近いグリーンを入れています。髪が長いので太ももにも反射するように塗っています。
And then here comes the reflection. The Layer is a normal layer with 100% opacity. The color is green, which is similar to Yamakaze's hair color. As Yamakaze has a long hair, I applied the reflections to her thighs as well.
7) 同じレイヤーでも良いのですが、ここでは念のため分けました。ここではアリスのボディスーツカラーを反射していることを想定してピンク色を入れています。なるべく体の端の部分(アリスいる方向)を意識します。
It can be on the same layer, but I separated them here just in case. Here, I added pink color, assuming that it reflects Alice's bodysuit color. As much as possible, focus on the edge of Yamakaze's body (in the direction Alice is facing).
8) 最後に強めのハイライトを入れていきます。ここでは不透明度100%の加算(発光)レイヤーを使用しています。主にGペンで描いたあとにぼかしツールを使っています。
入れる箇所は主に体の部位の中で出っ張りがある部分や体の端っこ部分、あとはシワになる部分に入れていきます。
シワの描き方についてはこの記事を描いている時点ではもう少し難しい方法を採用していますが、ハイライトで描くのが一番ハードルが低いと思います。細長く線を描くだけで大丈夫ですので。
Finally, add some strong highlights. Here I am using an additive (emissive) layer with 100% opacity. I mainly use the blur tool after drawing with the G Pen.
The areas to be inserted are mainly parts of the body that have protrusions, edges of the body, and areas that will get wrinkled.
As for how to draw wrinkles, at the time of writing this article, I am using a slightly more difficult method, but I think drawing with highlights is the lowest hurdle. All you have to do is draw a long, thin line.
ちなみに、最近ではあまり加算レイヤーは使わず、通常レイヤーを使うようにしています。噂に聞いたレベルではあるのですが、発光のレイヤーは印刷時に綺麗に出せないという話がありました。真偽はまだわからないので、色々調べる必要はありそうです。
加算レイヤーの場合は光がぼんやりと光って見えるような特徴がありますので、強い光が当たっているような表現に向いていますね。
By the way, these days I don't use additive layers so much, I use regular layers instead. I have heard rumors that the additive layer cannot be printed clearly. I don't know if it's true or not, so I think I'll have to do some research on this.
Additive layers have the characteristic of making the light appear to glow vaguely, so they are suitable for creating the impression of strong light.
右から順に1)~8)で使用したカラーです。
These are the colors I used. The order is from the right to left starting from 1) to 8)
以上
余談ですが、この後からちょくちょく塗り方が変わってきています。
この記事を書いているタイミングは抱きまくら風の村雨改二のイラストを描いた直後なのですが、そろそろ塗り方が固まってきつつある感じです。
ただ、もう少しいい感じに表現できるブラシはないものかと模索中ではあります。塗りムラが少なくてのっぺりしていて、かつソフトなエッジが欲しいところです。
エアブラシに近いですが、ぼんやり広がる感じでなく、Gペンのようにしっかり、でもエッジ部分は水彩のように少し薄まって表現できるものが欲しいところです。
カスタムで作るしかないか・・・?
今後も色々模索しながらいい感じのヌルテカな感じなイラストが描けていけたら良いなと思っています!


