![自己添削 self-correction [#2]](https://img5.samsuka.com/storage/8/ec/bo/c6f9d9-019e8c09-0566-7573-a239-f87ae950dcd9.jpg)
![自己添削 self-correction [#2]](https://img5.samsuka.com/storage/4/be/op/c6f9d9-019e8bde-b185-7b1f-8dd7-e09cfa517d75.png)
![自己添削 self-correction [#2]](https://img5.samsuka.com/storage/8/py/hd/c6f9d9-019e8bde-b18b-7694-97f0-1a3ea52623b9.png)
![自己添削 self-correction [#2]](https://img5.samsuka.com/storage/1/tt/nt/c6f9d9-019e8bde-b190-7bd2-9a88-a14f72effe65.png)
![自己添削 self-correction [#2]](https://img5.samsuka.com/storage/8/mb/xc/c6f9d9-019e8bde-b196-7dac-a222-dad24c0b0873.png)
![自己添削 self-correction [#2]](https://img5.samsuka.com/storage/3/ea/hy/c6f9d9-019e8bde-b19b-7cd9-b361-a95973b42def.png)
![自己添削 self-correction [#2]](https://img5.samsuka.com/storage/9/oc/hb/c6f9d9-019e8bde-b1a1-782d-88c9-55da9c528eb2.png)
![自己添削 self-correction [#2]](https://img5.samsuka.com/storage/4/rd/cn/c6f9d9-019e8bef-06e7-78c3-94ee-0262367e577c.jpg)

こんにちは。
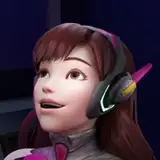
今回自己添削シリーズ第二弾としてプネウマを描きました!
English translation follows.
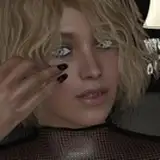
正直なところ、昔描いたプネウマのイラストは失敗作と言ってもいいほど自分としても出来が良くなかった作品だと思います。そのため、「直したい…直したい…」とずっと思い続けていました。
実際のところ、ホムラの自己添削より先にプネウマに取り掛かるべき対象だったのかもしれませんが、当時はまだこのプネウマのポーズをうまく直す自信がなかったので、結果的に順序は正解だったかなと思っています。
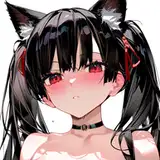
前置きはこのあたりまでにして、まずはビフォーアフターを見せた後、過去イラストの良かった点と悪かった点を挙げていこうと思います。
イラスト上に書いていますが、以下にもまとめます。
良かった点
・全体のサイズ(キャラクターが占める割合)
・髪の色合い
・胸のサイズ
悪かった点
・全体的にモヤモヤした色の塗り方
・顔がでかすぎる(バランスが悪い)
・線画が均一に太い
・色トレスが中途半端
・線画ガタガタで汚い
今回はさらにどこにフォーカスすべきかもまとめました。以下の3点が今回直す上で注目したポイントです。
(1)見せたい部分はどこか?⇨このポーズであれば胸の辺りが一番の注目ポイント
(2)アイレベルをどこに置くか?⇨まずどこを見せるのか
(3)イラストに安定感を出さない
これらの3点について解説したいと思います。
まず(1)ですが、見せたい部分はなるべく他の部位よりも見える割合を増やしてフォーカスすることに重きを置きました。
過去プネウマは顔と胸辺りの割合がそれぞれ半分ずつ(5:5)くらいになっていて、どっちが重要な部分か分かりづらいバランスになっています。
ここではやはり胸にフォーカスしたいので、胸以外の部分は全部胸より小さめの割合で描くことにしました。
次に(2)についてですが、アイレベルをどこに置くか考えました。
これはバランス的に過去プネウマも今プネウマも大きく変わらないのですが、プネウマがイラストを見てる人を覗き込むように目線を合わせる事を意識しました。
上の見せたい部分の話にも関係するのですが、過去プネウマを見ているとなんとなく口の辺りを見た後に頭頂部に目が行きやすい気がしますので目が行く部分がズレてしまっているなという気はします。
今プネウマに関しては、まず目が合って、胸に目が行く感じがあるかなとは思います。
次に(3)についてですが、ここが一番重要なポイントかと思います。
このポイントについてはあるイラストレーターさんからの受け売りではあるのですが、なるべく絵を安定させないことを意識することが重要です。
絵の安定というのはバランスの部分ではなく、線や体の各部位などが一定方向に安定した構造にならないようにするものです。
例えば、街中のビル群を目にしたときに、無機質さや硬さを連想すると思います。それはほとんどのビルが長方形で同じ方向の線の流れがあるからです。
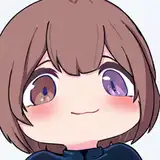
これは人間のイラストにも言えることで、下の過去プネウマみたいに、縦方向は体に対して頭がまっすぐ並んでいて、横方向であれば頭頂部の角度、目の並び、肩のライン、腕の方向がほぼ同じ方向の流れを示します。
上に線がかかっているとわかりにくいかもしれませんが、過去プネウマは硬い印象で肩が凝りそうな感じしませんか?
初心者にありがちな悪い癖
また、初心者がよく陥る悪い癖についても解説したいと思います。
上の悪かった点に記載していますが、「全体的にモヤモヤした塗り方」と「線画が均一に太い」の部分が悪い癖になります。
今回の過去プネウマについてはそれが如実に現れていると思います。
モヤモヤした塗り方についてですが、色を塗る際立体感を出そうとぼかしをかけることが多いかと思います。私もよくぼかしを使いますが、ぼかしを使う部分はかなり限定的にしたほうがいいです。
ぼかしをかける部分は、腕や脚などの丸い部分(円柱状)に絞ったほうが良いです。
もしどう塗ればいいか分からなければ一切ぼかさないというのも手です。Gペンのみで描いて見るのが良いと思います。
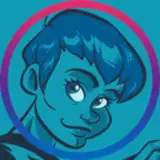
実際今プネウマの髪の部分については、Gペンでざっくり影を描いた後、硬めの消しゴムで光を当てたい部分を消していきます。毛並みが分かるように影と光の当たる部分は先を尖らせておくと髪の流れを表現しやすくなります。
下の画像は1影のレイヤーのみの表示です。こうして見ると結構シンプルに描いています。
次に「線画が均一に太い」に関してですが、ベクターレイヤーの使用による線画の調整をあまりしなかったのが原因です。
私自身ベクターレイヤーを一時期使っていたのですが、線の強弱をベクター線の編集で調整する手間があまり好きではなかったため、今はほぼ全てラスターレイヤーで描いています。
ラスターレイヤーはペンと消しゴムでひたすら調整するだけなので、あまり編集操作など気にせずに直接直したいところを直していくという流れになります。
また、ガタガタな線にならないよう基本的にはロングストロークで描き、ペン側のボタンに設定した取り消しボタンを使ってうまく行った線が描けるまで何度も繰り返します。
Gペンの場合は筆圧によって先が少し細くなりやすいので、そこで強弱が生まれます。私の場合は最近ではGペンの筆圧設定を少し変更したペンを線画用に使うことが多いです。
初心者が陥りがちな部分に関しては、以上を意識することでだいぶ良くなるのではないかなとは思います。私の絵がいきなり変わりすぎているので参考になるかどうかというところですが・・・😅
長くなりましたが最後に、今回の自己添削については自分で見ても大きな前進が見受けられたかなと思っています。
目に見えて自分のスキルが上がっていくところを見ているとどんどん楽しくなります。時にはちょっと失敗したなと思う絵も描くかもしれませんが、またこうして自己添削のように反省しながらより魅力的なイラストを描ければ結果オーライだと思います!
今後も引き続き魅力的なイラストを描けるよう励んでまいりたいと思います。
どうぞよろしくお願いします!
✨✨✨✨
Hi there,
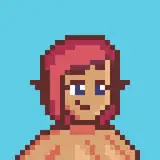
This time, I drew Pneuma as the second part of my self-correction series!
To be honest, I think that the illustration of Pneuma that I drew a while ago was not very good even for me, so much so that I could call it a failure. For that reason, I kept thinking, ``I want to fix it...I want to fix it...''.
In fact, I probably should have worked on pneuma before Pyra's self-correction, but at that time I still didn't have the confidence to properly correct this pneuma pose, so I think the order was correct in the end. I think.
Without further ado, I would like to show you the before and after, and then list the good and bad points of past illustrations. I will summarize it below.
Good points
・Total size (percentage occupied by the character)
・Hair color
・Chest size
Bad points
・How to apply colors that are blurry overall
・The face is too big (unbalanced)
・Line drawings are uniformly thick
・Color trace is half-finished
・Line drawing is shaky and dirty
This time, I have summarized where you should focus more. The following three points are the points I focused on when fixing this time.
(1) What part do you want to show? ⇨In this pose, the chest area is the main focus
(2) Where should the eye level be placed? ⇨What should I show first?
(3) Do not create a sense of stability in the illustration
I would like to explain these three points.
First of all, regarding (1), I placed emphasis on focusing on the parts I wanted to show by increasing the proportion of the parts that were visible compared to other parts as much as possible.
In past pneumas, the ratio of the face and chest area is about half each (5:5), making it difficult to tell which part is more important.
Since I want to focus on the chest here, I decided to draw all the parts other than the chest at a smaller proportion than the chest.
Regarding (2), I thought about where to place the eye level.
In terms of balance, there isn't much difference between Pneuma past and Pneuma now, but I was conscious of making Pneuma look at the person looking at the illustration.
This is related to the part I want to show above, but when I look at pneuma in the past, I feel like my eyes tend to go to the top of the head after looking at her mouth, so the part I look at is off the mark. I feel like that's not the case.
Now, when it comes to Pneuma now, I feel like my eyes first meet her and my eyes go to her chest.
Regarding (3), I think this is the most important point.
This point is something I was told by an illustrator, but it is important to be aware of not making the drawings as stable as possible.
Stability of a picture is not a matter of balance, but rather a matter of ensuring that the lines and parts of the body do not form a stable structure in a certain direction.
For example, when you see a group of buildings in a city, you may associate them with inorganicity and hardness. This is because most buildings are rectangular and have lines flowing in the same direction.
This can also be said for illustrations of humans, such as the past pneuma, where the head is lined up vertically with respect to the body, and horizontally, the angle of the top of the head, the alignment of the eyes, the line of the shoulders, etc. the directions of the arms indicate flow in approximately the same direction.
It may be hard to tell if there is a line on the top, but don't you think that past pneuma gives a hard impression and makes your shoulders feel stiff?
Bad habits common to beginners
I would also like to explain the bad habits that beginners often fall into.
As mentioned in the bad points above, the ``overall painting style'' and ``uniformly thick line drawings'' are bad habits.
I think this is clearly reflected in this past pneuma.
Regarding the fuzzy way of applying color, I think people often apply blur to create a sense of contrast when applying color. I often use blur, but it is better to limit the areas where you use blur.
It is best to focus on rounded (cylindrical) parts such as arms and legs when blurring.
If you don't know how to apply it, don't blur it out at all. I think it's better to draw it only with the G pen.
In fact, for Pneuma's hair, I roughly drew a shadow with the G Pen, and then erased the parts I wanted to shine with a hard eraser. It will be easier to express the flow of the hair if you sharpen the tips of the areas that will be exposed to shadow and light so that you can see the texture of the hair.
The image below shows only one shadow layer. If you look at it this way, it looks pretty simple.
Next, regarding ``the line drawing is uniformly thick'', the cause is that I did not adjust the line drawing much by using vector layers.
I myself used to use vector layers for a while, but I didn't really like the hassle of adjusting the strength of the lines by editing vector lines, so now I draw almost everything on raster layers.
Raster layers can be adjusted simply with a pen and eraser, so you can directly fix what you want to fix without worrying too much about editing operations.
Also, I usually draw with long strokes to avoid shaky lines, and use the undo button on the pen side to repeat the process over and over again until I get a good line.
In the case of the G Pen, the tip tends to become a little tapered depending on the pressure of the pen, so this is where the strength comes into play. Recently, I've been using the G Pen with slightly different pressure settings for line drawings.
I think that by being aware of the above points, you will be able to get a lot better at the things that beginners tend to fall into. My drawings have changed too much all of a sudden, so I'm not sure if they can be used as a reference...😅
As a result, I think I've made great progress in my self-correction.
It's more and more fun to see my skills improve visibly. Sometimes I may draw a picture that I feel like I made a mistake, but if I can draw a more attractive illustration while reflecting on myself like I'm self-correcting, I think the result will be okay!
I would like to continue to work hard to draw attractive illustrations in the future.
Hope you enjoyed in this content.
Thank you,


