Here's the render walkthrough! I hope I've described everything clearly enough :')
I've added the:
Timelapse
Lineart
PSD File
Below so you can look through and see the layers individually. Below is the transcript of each page.
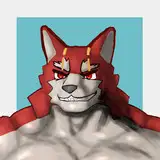
I’ll start off by separating my colours onto separate layers & naming them.
This is the most common was I render nowadays, it can be jazzed up with more layers of overpainting, but I find this way looks good without taking too long.
I only use 2 brushes for rendering. A textured square brush (Inserted photo of the Clip Studio Content ID: 1840330) & a default soft airbrush. When I find a brush I like, I'll use it forever.
There are many ways to lock a layer, these two are what I use most often. For the sake of layers I will use the Alpha Lock. This means that the number of pixels on that layer cannot be changed, but the colour can.
Here I am putting in hue variation only. Ask yourself “where would there be blush?” I tend to go with cheeks, ears, shoulders, elbows etc. I’m not thinking about light sources just yet, just skin tone variation.
On a multiply layer above the colours, I fill it in with the colours of the shadows I want.
I’ll use the square brush in 100% white to carve out the light. I also change the eyedropper tool to source from the current active layer. This is helpful to keep in mind when rendering this way.
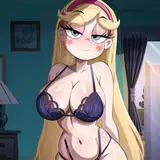
Here all the light is carved in! I went with a peach colour as I wanted it to look summery and bright.
I prefer this non destructive way of rendering if I’m not 100% sure where the piece is going, or if I’m colouring a comic. As it’s easy to duplicate & keep consistent.
Same as with the multiply layer, I’ll be using a soft light layer to add some saturation.
50% grey on Hard/Soft light is “Neutral”, so I can use the same process & lock the layer & paint on it. Also using the layer specific eyedropper to get accurate midtones.
Here I used a soft round airbrush and lightly went over the whole image. I focused then on the elbows, shoulders, blush area and hands. Then I went over the hair a little bit to brighten it.
Next I did the same layer set up, only this time in the Hard Light layer. I’ll use this for more pointed highlights, as this layer mode can be quite overpowering.
The lighting is small but I think small additions like this can really pack a punch!
I’m happy with the direction of the skin rendering so I decided to change the BG colour so I can work out reflective lighting.
I changed the BG to blue as I wanted something with a bit more contrast. Here I added another Hard Light layer to add some reflected BG colour. The colour will depend on what BG you choose. It helps ground your character & adds a more “3D” look.
You can add as many other light sources as you like. Be careful tho as it can end up looking a little busy, visually.
It was looking a little flat on the shadows and I wanted to push back the chest/shoulder area. So I added another multiply layer & painted in some more shadows. Especially where the palms meet the face, as the light will get trapped there. I also darkened the shadows around the forehead & under the strands of hair.
I changed the eyedropper tool back to “Pick from the whole image” & added a new layer to do overpainting & fill in any gaps.
I also use this layer to clean up any messy bits in the shading. If you want to smooth out the render & work it more this is the chance to do it as all the colours have been laid out.
Final touches now!
I alpha lock the lineart layer & colour it a dark red. This softens the darkness of the lines.
Last 2 layers! I add a layer on top of the lineart layer to add a bright white outline. This can also be used to separate sections (like the shoulder behind the hand)
Then I add another glow dodge layer to add some shine to the hair.
Finished!
Rael
2025-07-28 15:20:31 +0000 UTCDevilfella
2025-07-22 04:55:15 +0000 UTCRael
2025-07-19 20:19:40 +0000 UTCLara
2025-07-19 19:56:31 +0000 UTC