Hello fellow wizards!
Hope everyone’s having a fantastic Tuesday!
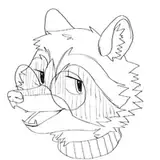
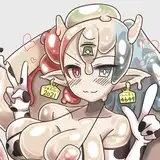
Today I’d like to show you how I’ve painted this head - possibly the best head I’ve ever painted.
Let’s get straight to the point!
1. Basecoat with Bugmans Glow.

2. Wash (with glaze consistency) around the eyes and the mouth with watered down Doombull Brown, adding the paint sparingly. Less is more and if you don’t think that the previous step was enough - you can always add more. It’s much easier to add more than to fix a mistake.

3. Add some watered down Khorne Red under the cheekbones. This will bring some more life into the face.

4. Start highlighting the face with watered down Cadian Fleshtone. Make this coat very smooth (through painting with thin coats - glazes).

5. Highlight with Kislev Flesh. Make every highlight smaller than the last one. Also use glaze consistency while adding this color.

6. Wash with Ushabti Bone, glaze consistency. Make sure to only hit the very edges of the old highlights, so that the brightest parts are the ones that are closest to the source of light (in this case the source of light is coming from the top).

7. Add the last highlight with Ivory from AK Interactive (or Pallid Wych Flesh). Make this highlight the smallest of them all and only add it to a few brightest points like the top of the nose, chin or cheeks.

8. Wash with very watered down Incubi Darkness around the eyes to add more contrast.

9. Pick out the eyes and teeth with Ivory from AK Interactive or Pallid Wych Flesh. You want to get a minimal amount of paint on your brush, just enough so it flows easily off your brush but not too much. If you have too much paint on your brush when you add these fiddly bits in - you have a very high chance of getting a big white blob of paint on your minis perfect face. Do you want that? Nope! Haha
The paint hast to be thick enough so that one coat is enough but not too thick too. I would recommend trying to achieve the perfect consistency on a test piece first and then getting onto serious business on a face like this. For me the perfect consistency is paint 1:1 water. I use a size 0 Windsor & Newton Series 7 brush and can’t recommend it enough!
You want to add the eyes and teeth as lines. Don’t try to poke the eye with your brush - you will fail! Always draw a thin line, from the nose side, towards the ears. Same for the teeth.

10. Add the pupils using the most matt paint you own. Add this with a circular motion. Again, no poking! 99/100 times you will fail if you try that! Do as the wise wizard of the 9000 level tells you - try to draw a circle, using the edge of the tip of your brush.
Same consistency, brush and idea as in the previous step.

That’s all for this tutorial! I will cover the green OSL recipe and steps in my next tutorial - it will be out this week!

Adding the collage picture for your convenience too ☺️

I really hope you like this one!
Thank you for being a supporter, it really means a lot to me and I hope that my content is truly worth the money you’re paying! 🤘🏼
Keep the magic coming!
Yours sincerely,
Mamikon
Mike
2025-01-21 10:37:13 +0000 UTCMC vd Pol
2025-01-21 07:12:52 +0000 UTCMike
2024-08-07 20:34:49 +0000 UTCN Rozanov
2024-08-07 20:27:03 +0000 UTC