Hello fellow wizards!
Hope it's been a busy-painting week for you all!
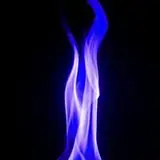
I've decided to close the week off with a very interesting topic - NMM Chrome (and added NMM Copper as a bonus).
It's really not as complicated as many try to make it seem!
1) We shall start with painting a hal circle with Altdorf Guard Blue (layer) and highlighting the outer (closer to the middle of the area in this case) edge of it with Fenrisian Grey, glaze consistency.

2) Next, add a few lines and mountain like shapes, overlaying the half circle, using black (layer consistency). This will be our horizon line - the lines are trees and the mountain shapes are mountains. Then, add Mournfang Brown in 3-4 thin glazes, covering the lower part of the circle. Make sure to leave the horizon line intact. It does not have to be even - it's the opposite - the more "artistically" uneven it is - the better.

3) Towards the top of the blue/grey area, add a glaze of Temple Guard Blue. This will be representing the sky, so it makes sense to make it blue (if you don't live in Great Britain!).

4) Glaze with Fenrisian Grey towards the bottom of the blue half circle. It makes sense to do that, as the middle of the half circle is the furthest part of the horizon and the light will be the brightest there. Also Glaze with Bugmans Glow towards the bottom of the lower circle.

5) Glaze with white, again, towards the bottom of the top half circle. The same logic applies here - the further the horizon, the brighter it is. When you glaze with white over the Fenrisian Grey in this step, make sure that white covers a smaller area than in the previous step. This will allow you to achieve a smooth transition.

6) Expand the horizon line towards the bottom a little bit, using a 1:1 mix of Rhinox Hide and Black in glaze consistency. Now we are basically making the area more visually appealing, more interesting and slightly more realistic.
This step concludes painting the NMM Chrome (SENMM). Next we will have a look at the Copper NMM.

7) Start with basecoating the area, that is supposed to be Copper with Rhinox Hide.

8) Glaze with Bugmans Glow. Apply this paint towards the brightest points of the area. In this case, we want to show that the top and bottom edges of the copper patter are the brightest.

9) Glaze with Doombull Brown towards the bottom of the area and with Ivory from AK Interactive towards the top of the copper. This will create a nice contrast, from reddish brown to light beige color. Edge highlight and with Ivory. Don't forget to pick out the screws with the same bright color as well.

This is it! Here is the final effect.

I've decided to also include the step by step picture, to hopefully make it easier for you guys to follow:

I really hope you like this one just like I do!
I really hope you like it and can use it soon! Please share your work with me using the #MamikonsWizards hashtag on social media. You can also tag me so I can have a look 😉
Keep the magic coming!🧙♀️
Cheers,
Mamikon
Mike
2023-01-13 13:43:12 +0000 UTCPip Boy
2023-01-13 04:19:38 +0000 UTC