Hello, fellow Wizards and Necromancers!
In today’s tutorial we are going to go through the steps of painting wearhered Death Guard armor.
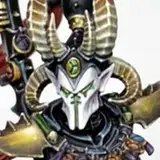
This is a test for a Golden Demon piece I have in mind - a heavily battle worn Dearh Guard Contemptor Dreadnought.
Let’s get into it!
1. Start with basecoating with Ivory from AK Interactive. If you don’t have this paint, you can use an alternative (for example Pallid Wych Flesh from Citadel). As always, it’s very important to apply a good, solid coat of basecoat paint as it will be our foundation for the future steps.

2. Paint the whole thing with Sepia Wash mixed 1:1 with a medium or water.

3. Add a glaze of Mournfang Brown on the sides, where the area should be darker (as the middle parts are closest to the source of light and therefore should be the brightest).

4. Wash with Sepia Wash. This time you can add it straight from the pot. It will allow us to tie the two last steps together.

5. Edge highlight all of the surfaces with the basecoat color - in this case it’s Ivory from AK Interactive.

6. Outline and basecoat all of the metal parts with any dark brown. In this case I forgot to take a picture after I’ve outlined the symbol in the middle but you should basecoat every metal part with dark brown, if you like the rusted look from picture 1 🙂

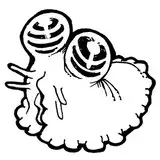
7. First, add dots/blobs of paint with Ivory all over the place. They have to be of different shapes and sizes, but they have to make sense - where would the chipping most likely appear? On the outer parts of the armor. Now that you’ve added the bright dots - start adding smaller, black dots into them (using any black paint, layer consistency), but make sure that the black dots are smaller than the bright ones. This will allow you to create a chipping effect, where the black is the dent in the armor, and the bright layer of paint around it is the paint chipping off around the dent. If you do this - you will achieve beautiful, realistic chipping, like the one you can see below. The rust effect is so simple you won’t believe it! Just use the liquid pigment rust from AK Interactive, straight from the pot. If you don’t have this product but you’d still like to do a rust effect - add heavily watered down (paint 1:4 water) Troll Slayer Orange all over the metal areas.

8. Add a few lines running down from the chipped areas. Use Mournfang Brown.

9. The last step will be simple - adding a bit more brightness to the rust. For that, use Troll Slayer Orange, layer consistency. Add it in small dots in the places where the rust should be the brightest. You want to keep it uneven - you don’t want every highlight to look the same. Rust is chaotic and so should be your weathering.

And that’s the tutorial wrapped!
Here is the collage for your convenience:

I really hope you like it.
Please share your results with me using the #MamikonsWizards hashtag on social media or by posting your results in the Necromancer exclusive Discord Server. You can also tag me so I can have a look 😉
Keep casting those spells!🧙♀️
Cheers,
Mamikon