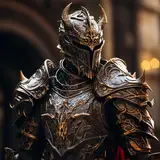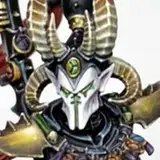
Hi fellow Wizards and Necromancers 🧙♂️
Hope everyone is having a great week so far. If not - this should hopefully make it better 😊 Today I have a double tutorial for you. Yes, two topics in one go! We will have a look at painting Salamanders (super efficiently) and applying OSL (this will also be super easy to do). Now, Salamanders are usually shown near lava, so this double tutorial is a perfect addition to my lava tutorial from last week!
Let’s get into it:
1. Basecoat with a 2:1 mix of Lupercal Green and Abaddon Black. Now, as always, add this in 2-3 thin coats, making sure that the surface has a even finish and there is no plastic showing though.

2. Next, we will add a coat of Lupercal Green mixed in a 1:1 ratio with Yriel Yellow. We want to add it from two sides, to have two highlights on each side of every detail. This will create a nice contrast with the darker tone in the middle. This will be quite an extreme jump, but as I said in the begging - I’ve tailored this technique to be very quick and simple. I’ve used an airbrush to do it and honestly, everything that you can do with an airbrush can be done with a traditional brush. Yes, it will take more time, but it can be done. I use a $30 airbrush from Amazon, so it’s not a big investment that you have to do, if you don’t own an airbrush. I rarely use the airbrush but sometimes it’s really helpful.


3. Next up, outline all of the details (not armor) and crevasses in the armor with Abaddon Black. It’s crucial to remove the excess of the paint from your brush before you do it so it does not create a spillage and ruin the armor. For this step, I recommend using a 1:1 ratio between the paint and water.


4. Next up, we will edge highlight all of the armor panels with a 1:2 mix of Lupercal Green and a Yriel Yellow.


5. Now onto the black parts - edge highlight them with Thunderhawk Blue.

6. Finish the black parts by adding an edge highlight of Fenrisian Grey but only on the top edges of the surfaces, as they would be the closest point from the source of light that presumably is coming from the top.


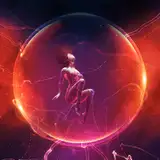
7. Now onto the OSL. This will be so easy you won’t believe me! Airbrush Mephiston Red from the bottom. Yes, just tilt your model backwards and spray Mephiston Red as if there is a red glow on the floor (lava, maybe? 🙂). Take your time with this two, don’t rush it! Less is more and you can always add more paint if you wish. The OSL results you can achieve using an airbrush when you know how to apply the glow are truly remarkable.


8. Next up we will add Evil Sunz Scarlet. Same idea - add it from the bottom. It has to cover slightly less area than the last coat of paint. Also, remember, that the OSL should be brighter towards the source of light. In this case, the red/orange glow is coming from the lava on the base, so the OSL should be brighter towards the bottom of the model.


9. And, finally, the last step will be adding Troll Slayer Orange or Orange Pigment from Hera Models (also through an airbrush, just mixed with the thinner).


And this is it! I know that this tutorial relied heavily on an airbrush, so I will do more tutorials about traditional brush OSL in the future 😊Stay tuned!
I really hope you like it. Please share the results with me if you try it out. You can do it by tagging me on social media or by using the #MamikonsWizards hashtag. Alternatively, you can join the Necromancer tier here and then become a member of my Discord Server, where Patrons share their work and I provide feedback.
Thank you so much for supporting me. Every single one of you. This really means the world to me.
Keep the magic coming!
Cheers,
Mamikon
Mike
2023-01-08 22:31:01 +0000 UTCYORDAN
2023-01-08 20:49:47 +0000 UTC