Hi fellow Wizards and Necromancers!
Hope everyone is having a fantastic end of the year.
If you thought that there will be no more new tutorials this year - happy to say you were wrong!
We will end the year with a Power Sword tutorial 😊
Let’s get into it:
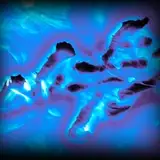
1. Start sketching highlights with a layer (layer consistency is usually paint mixed in a 1:1 ratio with water) of Celedor Sky in a checker pattern on the sword. A checker pattern means, that you put a highlight on one of the sides of the sword and then a new highlight on the other side, but you leave the area opposite to the highlight dark. If you have a look at the pattern I’ve done on the sword below, it should be more clear. Also, as you can see, I’ve made one of the highlights bigger (wider in width) than the other ones. This allows the sword to look more interesting and appealing to the eye. You don’t have to make the highlights look perfect in this step, we are just sketching.

2. Glaze (a glaze is usually paint mixed in a 1:3 ratio with water) with Celedor Sky, dragging the paint from the dark parts of the sword, towards the middle of the highlight. By doing that, you will create a smooth transition between the dark and bright sides. Apply this glaze 2-3 times. Let the glazes dry before adding a new coat. You can use a hairdryer to speed up the process, just use it on a slow setting, so you don’t blow the paint away.

3. Add a glaze of Temple Guard Blue mixed in a 1:1 ratio with Celedor Sky. As always, remember that the highlight has to be smaller (thinner in width) than the last coat of paint. So you want to add this mix inside of the previously added highlight. This will create a smooth transition between the different shades of blue.

4. Next, we will add a coat of Temple Guard Blue, glaze consistency. And again, remember to make this highlight smaller than the last one.

5. Glaze the entire sword with just 1 coat of Celedor Sky. Now, again, this will be glaze consistency, so very very thin, translucent paint. Adding a glaze like that will work like a filter in photoshop - it will make the whole surface look even, smooth. The highlights and color transitions will be softened.

6. The final step will be simple - edge highlighting the sword with white. Use layer consistency for the edge highlight, as we want the paint to be thick enough to leave a mark from the first try. Be very careful with this step and take your time. It’s not worth doing all this hard work and then ruining it by rushing the last step.

Once this is done - you can enjoy the final result!
It is not a easy technique at first, but if you practice a couple of times - it will become simple and the lessons learned while glazing swords like this will be invaluable in the future.
I really hope you like it. Please share the results with me when you try it out. You can do it by tagging me in your posts on social media or by using the #MamikonsWizards hashtag. Alternatively you can also join the Necromancers tier here on Patreon and gain access to my Discord Server where you can show your work, ask questions and receive feedback.
Happy New Year!
Cheers,
Mamikon
Mike
2022-12-30 15:06:49 +0000 UTCanthony rooney
2022-12-30 15:03:06 +0000 UTC