Hey fellow Wizards and Necromancers!
In todays tutorial, we will dive into freehanding - a thing that is feared by many painters but also very sought after, especially the good freehanding!
The first thing you have to do, is to pick a reference. It can be an object in real life, a drawing or a piece of artwork. You can also draw from your memory, but that’s a bit complicated!
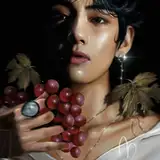
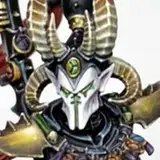
In this case, I will be working on a grail-like cup freehand. Here are the references I’ve used:

On this one, you can see the shape and the lines. I will try to copy them almost exactly.

Here we can see the color pallette - I will use it as a guide to the light placement and highlight spots.
Next, I cut out a piece of paper that is the size of the area I will be freehanding on, and I draw the artwork with a pencil. This allows you to gain a sense on the proportions. The benefit of doing this is that you will be able to do a test run before you actually start painting with your brush. It saves time and nerves!

As you can see, it’s super simple and I’m no master of the pencil! It’s very basic, but it’s enough for me to have a understanding of the shape, size and the feel of the upcoming freehand.
Now on the actual painting!
1. Basecoat the area you’re working on. I strongly recommend basecoating the area with one color, not mixed with any other paints. This is crucial, as it will allow you to go back to your freehand and fix any imperfections if there are any (and believe me, there will be imperfections, but that’s absolutely fine!). In this case the basecoat was done with Khorne Red. I’ve applied 3 layer consistency coats of paints, one after another, to have a strong foundation before I go onto the freehanding part.

2. Next, we will start sketching the shape of the freehand with white. I choose to work with white here, as it’s easy to cover with the basecoat, if there are any imperfections.


2. Next, when we have made sure that the sketch it almost perfect and it represents the shapes that we need, we go onto adding color and details. First, we will cover the cop part of the cup with 1:1 mix of Rhinox Hide and Mournfang Brown. This is the basecoat for our gold NMM. I tend to break the larger freehands into small areas, so I can focus on each of them separately and make sure that they are all as good as possible from the technical perspective.
After applying the brown basecoat, we will go on to adding the fleur de lis shape. I outline the symbol using a 1:1 mix of Yriel Yellow and Ushabti Bone, layer consistency. As you can see, I’m trying to be neat here (but it’s still not perfect!) and you should too, as it’s always nice to do a tidy freehand, especially if you’re working on a standout piece.

3. Next we will add the vertical highlights on the belly of the cup. We will be using the Yriel Yellow 1:1 Ushabti bone mix again but in glaze consistency. Here I’m using the reference picture of the gold cup mentioned before to know where to place the highlights. One the vertical lines are done, we will add a thin glaze of the same paint mix over the entire surface of the cup (except for the symbol in the middle). This will tie the colors together and work as a yellow filter.

4. Next we add a glaze of Ushabti Bone on top of the previous highlights to increase the contrast of the NMM gold. Make sure that ever highlight is thinner in width than the last one - this will allow you to achieve a smooth transition between the colors.

5. If you look at the reference picture of the real cup I’ve provided earlier in this tutorial, you will notice that it has some red color bouncing off the side of the cup. I really liked this idea and wanted to incorporate it to my freehand. For that, I’ve applied a glaze of Mephiston Red on top of the highlights on the right side of the cup.

Next we move onto the smaller details and apply the same techniques and logic on them.


I hen you’re working with tiny surfaces and you’re trying to create the most perfect freehand ever, you need to fix mistakes, no matter how much you don’t want to do that. For example, here, I’ve painted the “neck” of the cup as a uneven shape, so I had to fix it by reducing the right side of it in width. The moral of this story is: if you’re looking for perfection - don’t be afraid to tear your work apart and start over.

6. Next onto the flames - first I wanted to see how they would look, so I freehanded them onto the drawing of the cup I’ve done before.

7. When I was happy with it, it was time to paint it onto the real thing. We start with a outline using Abaddon Black. Same idea as with the sketching with white in the beginning - we want to outline the shape first and then go onto the actual freehand.

8. Next, we will glaze some white towards the bottom parts of the fire. This will work as a basecoat for the flames - they will naturally be more bright towards the area where the flame “begins”.

9. Next, we add a glaze of Yriel Yellow on top of the white and parts of the black areas.

10. Next we will glaze Troll Slayer Orange towards the top areas of the fire to showcase that it’s becoming darker and more intense as it evaporates.

11. In the final step, we will finish the gold base of the grail. It’s important to remember that you can divide the freehand into separate areas to make the process easier and less stressful. Focus the main highlights in the areas that would naturally get most of the lighting - so the very lowest areas and the top areas. You can sss the thick line of highlights on the top part of the base on both sides.

And with this being finished, the banner is done.
Here are some useful step by step shots for you:


I really hope you liked this tutorial.
I am also planing to release a tutorial about simpler freehanding soon, so stay tuned.
Thank you very much for your continuous support. It means the world to me.
Keep casting those spells!
Mamikon
Xzarnyan_minis
2023-04-26 10:43:52 +0000 UTCSzymon Czajka
2023-04-26 10:23:09 +0000 UTC