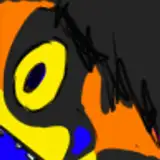
Hi fellow Wizards and Necromancers! Time for the firs tutorial of the week! This time we will go back to working on this Raven Guard Terminator with a awesome Green OSL on it. Reminder: this model with be given away to one of you when it's finished, so stay tuned! :) A PDF version of this tutorial is also available for your convenience - it is attached in this post, below.
Explanation on layer and glaze consistency is on the last slide. Let’s get into the tutorial!
1. We will start with a very soft glaze consistency Caliban Green and we will apply it on all of the areas that would be exposed to a source of light that is placed next to the Terminators leg.
Follow the arrows for the light placement logic.

2. Continue applying Caliban Green in glaze consistency in the same areas, but now drag the paint towards the source of light on every panel affected by the OSL (object source lighting). In this case, as the light is coming from the bottom, we will be dragging the paint towards the bottom of every panel. This is because the place where you end your brushstroke with a glaze holds the most of the pigment.

3. Mix Caliban Green in a 2:1 ration with Yriel Yellow and apply it in glaze consistency over the same areas but now you will need to make the highlights more prominent, more visible, so you will place this highlight inside of the last one, so that this highlight is “hugged” by the previous one, creating a smooth transition between the colors.

4. Continue pushing the highlights brighter using a glaze of a 1:1 mix of Caliban Green and Yriel Yellow. With every next highlight, cover a smaller area, as explained in the last step.

5. Now that we have established the main highlights, we will add more soft glazing over the entire area, to blend all of the colorstogether for a more natural look. For that, we will use a glaze of a 1:1 mix of Caliban Green and Yriel Yellow over the entire area affected by the green light.

6. Time to go back to pushing the light effect brighter – for that we will use a 1:1:1 mix of Caliban Green, Yriel Yellow and Ivory from AK Interactive, glaze consistency. Again, cover just a fraction of the panels with this color, making it brighter towards the source of light, showing that the light is stronger towards it.

7. The final step will be done using the previous paint mix (1:1:1 mix of Caliban Green, Yriel Yellow and Ivory) but in layer consistency – we will just add edge highlight with it, focusing on just the down facing edges of the armor.

Here are a few pictures of the end result:


Thank you very much for supporting me – it means the world to me! I dream of being able to paint and make tutorials full time, so if you like my Patreon – please tell your friends about it. It would make a massive difference to me and hopefully it will be beneficial for your friends too :)
*Layer consistently = paint mixed in a 1:1 ratio with water.
*Glaze consistently = paint mixed in a 1:3 ratio with water.
Best wishes,
Mamikon