Hi all.
I get asked a lot how I paint up our kits. It's something I feel weird about, as I don't consider myself to be great at painting, mostly just good at getting stuff ready for tabletop.
So, I thought I might use one of our upcoming kits for the month to fully talk about my fast and dirty painting process. I use this same process for each of my armies, just changing out the base layers.
The specific colors don't matter so much as the pattern, so feel free to swap out any part for the colors of your army.
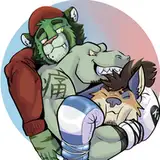
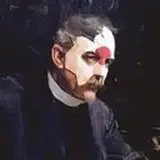
Finished model:

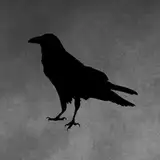
Starting with a black prime:

We move on to metallic. Partially to get them all done at once to not get metal flakes mixed with the other paints. Partly because I hate them, and want them to be done. They can be applied messily, you're going to be painting over most of them any way.

Next is red and blue. From this point we're going to be doing all of the base layer colors. The order is only important to think about to minimize what you have to paint over, so start with the larger sections.

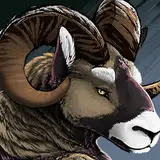
Brown, Green and yellow are next. I mostly use Vallejo paints with a few Citadel and Army painter pots mixed in. No real color loyalty, just whatever feels right for the army.

Black and tan are last before our first wash. For the black, be sure to leave some edge around the metal sections to make the paint seem chipped.

Add on your base texture of your choice, in this case, Agrellen Earth.
I missed the mutton chops for the above pic, but I corrected it before the wash.
Also clean up the edge around the base with black.
For our first wash we'll be using 30ish% nuln oil, 30ish% Vallejo umber wash and about 40% distilled water, with just a couple drops of gloss coat to keep the paint from matting up.

After the wash we go over the whole model a second time with all the non metallic base layers, hitting just the raised areas.

Afterward the whole model gets a very light drybrush with tan, or beige. I used to do individual colors for different areas, but honestly, beige just works all over.

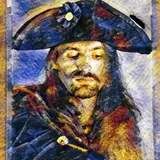
Mostly done now. We want to bring those highlights down a bit and blend everything together, so we'll be using vallejo's dark rust wash (thinned down to 1:4 or so) over the whole model.
This makes the flesh look more warm and the metal more worn.

Lastly the whole model gets a 2:1 water : semi gloss clearcoat, and the base ring a gloss clearcoat.
 And that's it, you're ready for the tabletop. A character like this generally takes under an hour (minus drying times) to get done.
Please comment or shoot me a message if you have any questions, or want more detailed lists of colors for any range, but do keep in mind a lot of those colors will just be my best guess :D
Also, let me know if this kind of thing is something you want to see more of in the future. We're primarily a sculpting crew, but we have some hobby knowledge.
Cheers,
-G