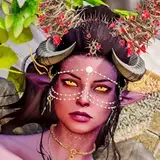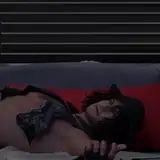
(Pics above have no edit. Only reshade applied in-game)
(You may also want to see this post to have better base-game textures)
I want to let you guys know that this preset belongs to kindlespice and i just made a few changes to make it look better to my taste. Kindlespice's Dove Reshade Preset is already amazing as it is. However, to be honest these simple couple of changes to the original preset make the re-shade preset so much better.
Note: This may not suit to your taste or your computer may not be able to handle it (Even though it's kind of low-end friendly. Because even my pc is low to mid-end :P) . So let's jump into it!
Step 1: Install Re-Shade & Preset Made By Kindlespice
Installing reshade is not that complicated. I could explain it but i can do better for you! Kindlespice, the owner of the Dove Reshade preset made a video to explain how to download and install reshade (and her preset). You can watch the video from here to learn how to download and install reshade and reshade preset. The video is around an hour long but trust me, it takes less than 10 minutes. Just find the time stamps for installing steps and you got it. Rest of the video mostly is about how to fix this and that and so on.
If you already know how to install the reshade or have the reshade installed already, you can go ahead to Kindlespice's tumblr blog post and download her Dove Reshade Preset. Make sure to follow steps to make it work for your game.
Since it's their preset and know every aspect of it, i don't think i can explain the steps better than them. So stick to the steps please, to make it more efficent. But as always, if you have any question, don't hesitate to ask it away. If i know the answer, i'll help you out ♥
Step 2: What did i change? What settings made my game look different than the original reshade preset made by Kindlespice?
As reshade's purpose is giving more vivid colors to the original colors, most of the reshade preset makers giving too much brightness. And once you play around the %'s, it can break one another setting. To prevent this, i didn't change a single % so it would stay healthy. But i played around the effects! So that my game looks so much more clean, vivid, obviously less bright and more eye-candier(?).
You can see the tiny changes i've made above (last slide) and see how these tiny changes impacts to the reshade overall. Trust me, it's really gameplay friendly. If your game gets a bit laggy, you can remove the "Clarity" tick. Personally, i believe clarity makes the game look neat and clean (so i highly recommend to using it) but performance comes first :)
⚠️So, make sure to apply the settings after you completely done with installing reshade + Kindlespice's Dove Reshade Preset.⚠️
⚠️Also, do not use DoFs (Shift + 2) and MXAO (Shift + 3) as they cause dramatic fps drop - even though you turn off edge smoothening. Just don't turn off your edge smoothening at all (you can even keep it at lowest if your pc can't handle it) so you won't be able to use DoFs and MXAO at all. :)⚠️
Last words
I have 2 different reshades (a friend's personal-made and edited dove-reshade) . The main reason why i have 2 different reshade preset is, the first one is close to the original game. I take screenshots of the new sims with it. It mostly stays true to the game without reshade (it's set up %10 more color and %60 clarity, %5 darkness). That reshade is more about clarity and costs like 30-35 fps drop. This makes the game laggy. So that's only for taking screenshots and showcase my new sims. BUT the second one, Kindlespice's Dove Reshade Preset is gameplay friendly as it has less clarity (only as effect).
When i play the game, i use kindlespice's dove reshade preset but with the settings i've made changes.
Hope this will be helpful and makes your game more fun to play ♥
knzkprtu
2021-09-03 22:40:14 +0000 UTCIlokana
2021-09-03 22:34:32 +0000 UTC