![[GUIDE] Photography: How To Take Better Screenshots](https://img5.samsuka.com/storage/3/cs/vs/c6f9d9-019e8ef8-cbd3-75f9-b0d1-0a35ec078b24.png)
Hi everyone! Around 1 and half month ago, i made a poll about if you guys would be interested to know how do i take screenshots in game. Most of the votes wanted me to create a little guide so here it is. Remember that there are many different ways, different setups and such for taking screenshots but this is what i do and how i do. You can use it, tweak it to make it fit your liking more, don't use it at all. It's all up to you. :)
Before i begin, i'm sorry about mind destroying English i'm going to use. Since my mother tongue is not English, i make plenty of catastrophic mistakes. :')
Table of content:
1- Required mods (the ones i suggest and the ones used in general)
2- Setup for studio
3- Positioning, placing, lighting
4- Posing, angles, reshade
5- Photography outside of the studio
--------------------------------------------------------------
I listed the mods we're going to need for screenshots. I'm not going to explain them with looong paragraphs because if you just google them, you'll see their creators explaining them with videos and such.
You need these items for studio setup. If you don't download them, the studio will be missing some items in it. So, please download them.
Studio lights
Photo Studio Objects Set
--------------------------------------------------------------
Sooo.. There are looots of different setups for studios. But since i prefer taking screenshots above waist or knee, i prefer direct lights from the source. I'll also share my Studio room so you don't have to create it again. :P
This is what my studio looks like. It's very simple, basic and cheap. But, it does the job. In the end, it's just for photography.

--------------------------------------------------------------
So, before we start taking photos, we need to make some things. Like, placing the teleporter object to the right spot. Because we want to get the lighting from the source in a good way. Not sooo shiny, not so dark, it needs to be just right.
After you place your teleporting object to right spot and teleport your sim to it, it would look like this:

But, how do we know where is the "right" spot for teleporting object?
First, enter to build mode and find "teleport" object. You can type to search bar and find it (you need teleport any sim mod). And then, when you get closer to the ground with your mouse wheel, the "purple" screen disappears. When this happens, you will see the tile lines on the ground like this:

These 3 bold lines are our places for placing teleporting object in a "right" spot. 1 is darkest, 2 is middle, 3 is lightest. 1 is not dark dark but in comparison, it's darker than 3rd.

In this guide, i used 3rd one but i usually change between 2 and 3. You can try and find the more appealing one for your own taste.
Lastly, to put it between all light sources (like x,y axis), you can use this line like:

After placing our Sim, the next step is lighting. You can play around light to get a better look.
When you click to a lighting source, click "set color and intensity" and chose "all lights". You will see options like these:

I usually use the one that in the square. It's kinda clearer compared to other ones. But the ones i shown with arrows are also fine. As i said multiple times, it's all up to your liking. Go wild! You can also chose other lighting colors.
Dimmer is power of lighting. I usually max it out but you can experiment this too. Remember, key is your personal taste!

In build mode, you can also change the color of the screen.
--------------------------------------------------------------
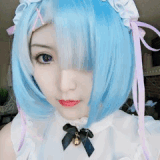
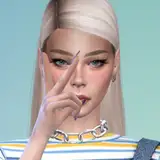
And now it's time for the main event, posing! After you teleport your sim to the teleporting object, click on your sim and click "pose by pack". After that, chose your desired pose and then press 0 (or pause) to stop your sim in that pose. And then, click tab, enter to camera mode.
Now, you can zoom in with Z and zoom out with X. Personally, i believe zooming in all the way makes details more visible. So when you zoom in all the way, place your camera to an angle you'd like. Right before taking screenshot, enable reshade and then take your screenshot! I use a personal made reshade preset. So you are free to use your favorite one!

IMPORTANT: Remember that when you place your Sim into the studio, all light sources will splash onto your sims face and body. That's the reason why she looks eye-blinding bright on the left. If you play around the lighting sources, dimmer and your sims placing, you can get even better lighting! :)
--------------------------------------------------------------
For the last part, how to take better screenshots outside of the lots / more likely outside of the studio. Is lighting still matters? Of course it is!
In this part, i'll use my recently favorite spot as example. It's in San Myshuno.

After you travel to destination, find yourself a spot before you start taking your screentshots. For this guide, i'll use this spot:

Why this spot? For me, it's being a clearing. Less obstacles, good lighting / sunny weather.
IMPORTANT: So, this part is pretty much everything about taking photos outside of the lot. As you know, with the Seasons Pack, you can sort of control the weather. BUT, if you use UI Cheats, you can definitely decide to time and weather. To me, between 2 PM and 4.30 PM is the PERFECT time for taking photos due to sun color and shadow drop.
When you reach your destination, you should take the shadow in front of you. If you take the shadow behind you, the sun rays will rain your sim's face and make it horrendously bright.

If you can keep the shadow between these lines (you can rotate your sim between these lines for different lighting), it would give you an amazing lighting for TAB camera mode.
After these steps, all you need to do is chose your favorite pose, enter TAB mode, activate your favorite reshade and snap!

Notes:
Personally, i don't use studio much since outside lighting is waaaaaaaaaaay better. So there is unlimited amount of free room for you to experiment it to make it fit to your taste better. :)
Skin tone, lighting, in game time, angles, reshade and such highly impacts to photos.
I hope it's helpful for you. Feel free to ask / add anything you want to ♥ :)