It is easy to make comparisons between the arms and legs, as they are both limbs with similar structures. However, the arms have a different function. They are not required to support the body's weight, and are better suited to more complex movements.
Common challenges to drawing the arms include dealing with foreshortening due to the bending and rotation of the limb, and conveying subtle changes in form through the arm. This lesson will look at the gestures of the arm, its structure and anatomy, and how to draw its forms and surface features.
The arms, though capable of independent movement, often cooperate too. The symmetry of the body and connection to the shoulders can help with creating continuity between the arms. This is useful for drawing their gesture.
One way to handle this is by connecting the arms across the shoulders with a long gesture line. This is very much an interpretation – there is no direct connection between the arms – but it helps give the arms a more 'connected' feel and avoids wooden gestures.
The arm on its own has distinctive asymmetry, similar to the leg, giving the form and contour a back and forth rhythm. Switching between sides and working through the forms can help with creating flowing gestures and improving proportion.

Gesture line (orange) of the arms flowing across the shoulders.
The muscles and bones of the arm are smaller than those of the the legs, so the rhythms are less dramatic, and can change as the arm rotates. The shoulder is a handy starting point due to the curve of the deltoid, which directs the rhythm down the upper arm to the elbow, back into the lower arm and into the wrist and hand.
The arm's asymmetric structure results in dips and bumps in the contour lines not aligning, but angling against each other. This is less consistent due to the arms rotation, but still results in a mixture of longer and shorter curves in the contour.

Rhythms (green with red arrows across) and angles (orange with blue arrows along) of the arm.
The rhythms of the arm change with pose. In poses where the arm is bent, it might be best to travel around the elbow and back into the forearm. When the palm of the hand faces down (pronation) there is long curve on the outside of the arm and a stepped curve on the inside of the forearm, but as it twists, the bones of the lower arm change position and how rhythm travels down the limb. For more information on rhythm and gesture, see Lessons 14 & 15.
The arm broadly separates into an upper and lower half, but has an interchange of volumes that can help define the orientation of the arm.

Rhythm lines (green) as they cross over the arm (red) in different poses. These are just possible approaches – there tends to be multiple effective 'routes' through the body.
The volumes of the shoulder overlap with those of the upper arm, which in turn have a slightly narrower profile when viewed from the front or back. The volume of the upper arm is then overlapped and clasped by those of the lower arm. The lower arm typically looks broader at the front or back – switching the orientation of the upper arm, until the forms transition to the wrist.
Like the legs, foreshortening is another common challenge of drawing the arms thanks to their long, slender forms.

Alternating wide (orange) and long (teal) sides of the arm as they interlock.
Foreshortening often results in overlapping contours. The interlocking forms of the arm tend to make overlapping contour lines a bit easier to spot, especially when the forearm overlaps the upper arm.
The composition of the arm also affects the cross section, particularly in the forearm. The top part of the forearm has a more rounded cross section, whilst the wrist is more squared off, especially on the side of the thumb. This can help with drawing cross contours that wrap around the arm.
For more on foreshortening, see Lesson 20.

Tricks for helping with foreshortening include using overlapping lines (yellow) and using cross sections (blue) to direct wrapping lines on the surface.
Bones
The bones of the arm are not dissimilar to the leg. They are long and slender in structure, and like the leg, there is a single larger bone in the upper arm – the humerus – and two smaller bones in the lower arm – the radius and ulna.
The humerus is mostly concealed by muscle and fat, generally only creating visible surface landmarks at the elbow, where the medial and lateral condyles create bumps on the inside and outside of the arm.
The radius and ulna have a few surface landmarks. The ulna creates the main 'point' of the elbow – the olecranon – on the arm as it hinges against the humerus, and may appear as a groove running down the outside of the arm to the wrist. It shows as a rounded bump on the outside of the wrist – the styloid of the ulna. The radius starts buried under muscle, but becomes visible at the bottom of the arm, where it forms a slightly flattened surface running to the inside of the wrist, beside the thumb. It may show as a couple of small bumps on top of the wrist, including the styloid of the radius on the outer edge.

Bones of the arm and their major visible landmarks.
One of the key characteristics of the lower arm is how it can rotate at the elbow to twist the hand, leading to pronation – the palm facing down – and supination – the palm facing up. (The lower leg can do this in a limited way too, somewhat directing the foot outwards or inwards.)
This movement is caused by the radius. At it turns in – pronates – it crosses over the ulna. This means the landmarks of the wrist switch around as they rotate with the hand, whilst the humerus and olecranon stay put.
When looking at the muscles of the arm, it is simpler to split the upper arm from the forearm. In the upper arm, most of the volume and surface forms are the result of a few major muscles; the deltoid, biceps, brachialis and triceps.

Ulna (blue) and radius (green) in pronated and supinated positions.
Muscles
The deltoid is a key muscle of the shoulder, and wraps around the top of the upper arm. The direction of the muscle flows into the side of the arm from the collarbone and scapula – this is especially noticeable in its bottom edge.
The biceps and triceps are two muscles that oppose each other on the front and back of the arm. When one flexes, the other stretches – keep an eye out for this when portraying their forms, as they visibly change with pose. The each section of the triceps connects to a large tendon just above the elbow, which tends to create a dimple in the back of the arm or a little flattened plane depending on the pose.
The brachialis runs between the triceps and biceps on the outside of the arm, creating a slightly flattened surface between the two muscles. (Most of it is tucked out of sight under the bicep.)
The muscles of the forearm are very complex and layered. They allow the hand to move in a wide range of directions as well as do much of the work in operating the fingers. The forearm is effectively the puppeteer of the hand, and its forms will change as the hand, even the fingers move.

Muscles of the upper arm in front and side views.
The extensor muscles and the flexor muscles are two major groups that add a lot of volume to the forearm. These groups are made of multiple muscles that interlock and layer on top of each other. Broadly, they oppose each other, so when one group is activated and flexing, the inactive group gets stretched out.
The extensor muscles sit on the back of the forearm, and are a bit easier to see. In particular, they might be more visible when the fingers or hand are extended – look for V-shaped volume pointing towards the elbow.
The flexor group forms a rounded muscle mass on the inside of the forearm. The definition of the individual muscles is generally not clear, though they add a lot of bulk to the forearm.
Whilst the muscles of the forearm aren't always visible, it is worth understanding the direction in which the groups wrap around the arm. This helps with rendering surface forms and showing how the forms of the elbow interlock.

Muscles of the forearm in front and side views. As there are a lot of individual small muscles, this breaks them up into groups.
The muscles of the forearm wrap around the end of the upper arm to 'clasp' the elbow. The biceps dips in between the two muscle groups. In particular, the brachioradialis creates a line that overlaps the upper arm and feeds into the lower arm.

The form of the upper arm (green) is wrapped by the muscles of the lower arm (blue) so it slots between them.
Fat & Skin
The muscles of the forearm wrap around the end of the upper arm to 'clasp' the elbow. The biceps dips in between the two muscle groups. In particular, the brachioradialis creates a line that overlaps the upper arm and feeds into the lower arm.

Surface features of the elbow (orange), with the creasing of the elbow on the left and cubital fossa on the right.
The elbow has some distinctive surface forms as well. When the arm is straight, it forms skin creates at the back, and often a dimple forms just to the side of it as well. On the inside of the elbow, another dip – the cubital fossa – forms, especially when the arm bends – this is a gap created between the muscles.
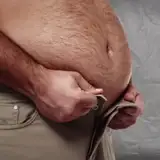
The arm tends to have less fat on it than any other area of the body, especially the forearm, though this does vary from person to person. There is a fat pad on the inner back side of the upper arm, and there tends to be more fat on the upper arm. Fat doesn't really have much affect on the surface of the arm otherwise, and there is less protective fat here – as any one who has banged their elbow will know. Fat smooths out the definition of the muscles, especially as the muscles of the arm are not large.

Approximate distribution of fat through the upper arm.

Edgar Degas - Angel Blowing a Trumpet (Source: Cleveland Museum of Art)
The arms are an area of the body where a lot of the definition and structure can be hard to discern, especially when there is less muscle. The form is not as obviously variable as many parts of the body, such the changing volumes of the torso or legs.
This study by Degas is an example of subtle indication of forms in a longer format drawing. To push the sense of form in the arm, a little modelled tone is added alongside the shadows to show how the form rolls away towards the contour. This is especially apparent on the upper side of the closest arm.
The arms have few hard or firm edges and the surface forms are relatively rounded and soft, so harsher marks would look out of place.

Giacomo Franco - Studies of Arms, Shoulders and Hands (Source: New York MET)
This example shows shorter studies of arms. In line drawings, it can be a challenge to manage indicating action and structure in the arms without making the marks look too heavy.
Here, though the arms shown are decidedly muscular, allowing for a bit more leeway, the use of contour lines internal to the outline is restrained – the muscles are indicated with just a little line. Much of the form and action of the arm is shown by the less obtrusive wash, often fusing the dips created by active muscles to larger shadow shapes.
Recommended Materials: Any
Further Reading: Lesson 14 – Gesture 1, Lesson 15 – Gesture 2, Lesson 20 - Foreshortening
For this exercise, try sketching both of the arms in whatever gesture they may be in. This necessitates including at least some of the torso and shoulders, as the arms connect here, and their movement often has a significant effect on the forms of the torso.
When doing these sketches, look for a variety of different poses, especially including lowered and raised arms, poses from the front and back, and arms twisting in different directions. Look for how the contours change through the length of the arm, and the angles it twists in.

Quick sketches of the arms in different poses.
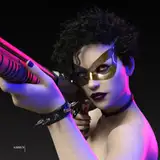
It is quite common for the arms to cross over each other in poses, either due to them overlapping in a pose, or being in a more folded position. These are some of the more difficult poses to draw the arms in.
When drawing crossed arms, first think about the continuity of the limbs – even when they are partially concealed, they still continue behind the obscuring form. One way to deal with this is to lightly sketch the covered up arm as if the one in front of were seen through at the beginning of the drawing. In more folded up poses, look at how the forms of the arms compress against each other too, as these small changes in contour or form can help show contact.

Continuity helps with drawing overlapping arms – here each arm is marked by blue and orange dashes. It also helps with handing accessories and clothing, such as this bracelet.
–
>> Watch the Week 30: Arms main lesson HERE (Student & Life Tiers)
>> Watch the Week 30: Arms demo HERE (Student & Life Tiers)
>> Practice your drawings with our photo set HERE (Student & Life Tiers)
Find links to the whole Tutored Life Drawing Course HERE